


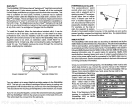
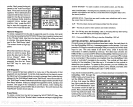

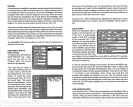
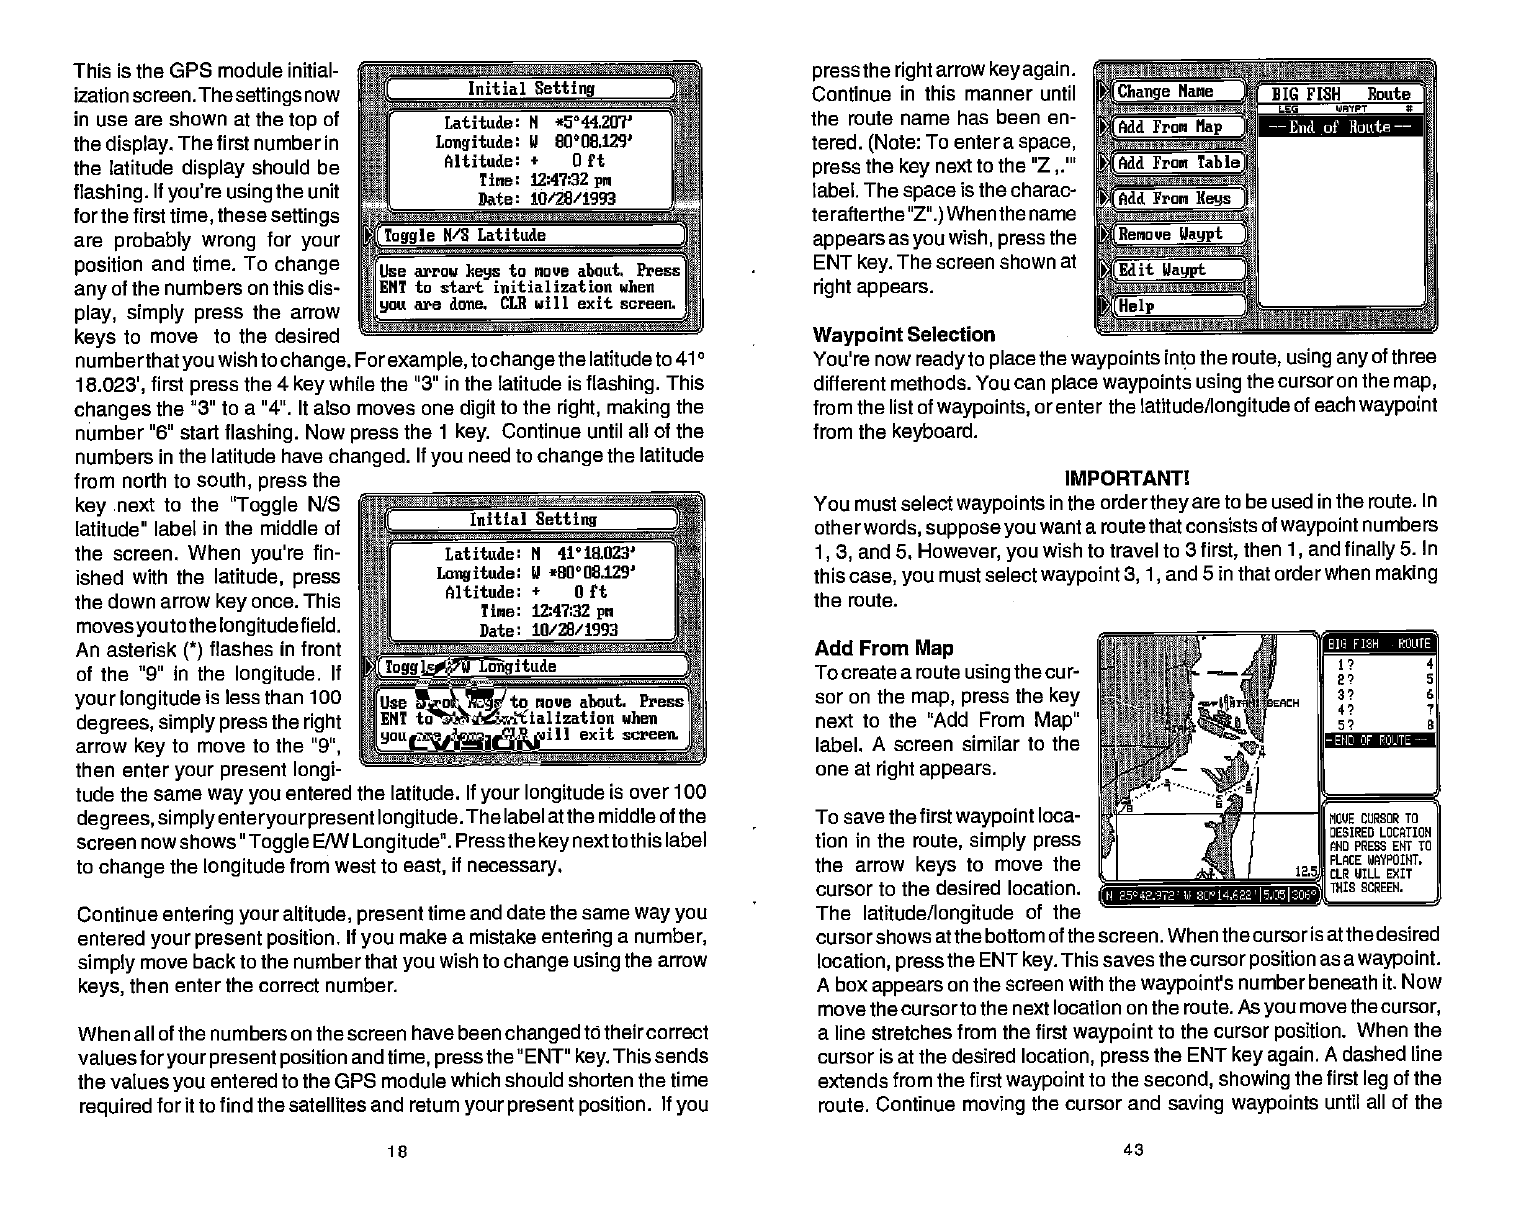
This is the OPS module initial-
ization screen.The
settings
now
in use are shown at the
top
of
the
display.
The first number in
the latitude
display
should be
flashing.
If
you're using
the unit
for
the
first
time,
these
settings
are
probably
wrong
for
your
position
and time. To
change
any
of the numbers
on
this dis-
play, simply
press
the arrow
keys
to move
to the desired
fle
Initial
Latitude:
3
Longitude:
Setting
II *5'44.2J7'
J 80O8.129
Altitude:
+
Oft
'
Time:
Date:
-
12:4'bBZ
pm
10/28/1993
—a
1oggle
N/S
Latitude
numberthatyou
wish to
change. Forexample,
to
change
the latitude to 410
18.023',
first
press
the 4
key
while the "3" in the latitude is
flashing.
This
changes
the
311 to a "4". It also moves one
digit
to the
right, making
the
number "6" start
flashing.
Now
press
the
1
key.
Continue until all of the
numbers in the
latitude have
changed.
If
you
need to
change
the latitude
from north to
south, press
the
key
next
to the
"Toggle
N/S
latitude" label
in
the middle
of
the screen. When
you're
f in-
ished with the
latitude,
press
the down arrow
key
once. This
movesyou
to the
longitude
field.
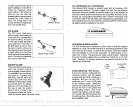
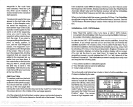
An asterisk
(*)
flashes in front
of the "9" in the
longitude.
If
your longitude
is less than 100
degrees,
simply press
the
right
arrow
key
to move to the
"9",
then
enter
your present longi-
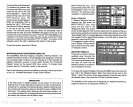
rr
IiL
Initial
es-
Setting
Latitude: N 41° 18,023'
Longitude:
II *80°08.129'
Altitude:
+
0 ft
Tine:
12:47:32
pm
Date: 10/28/1993
w——a
Ttiile
E/W
Longitude
tude the same
way you
entered the latitude. If
your longitude
is over 100
degrees, simplyenteryourpresent longitude.
The label atthe
middle of the
screen nowshows"
Toggle
E/W
Longitude".
Pressthe
key
nextto this label
to
change
the
longitude
from west to
east,
if
necessary.
Continue
entering your
altitude,
present
time and
date the same
way
you
entered
your present position.
If
you
make a mistake
entering
a
number,
simply
move back to the number that
you
wish to
change using
the arrow
keys,
then enter the correct number.
When all of the numbers on the screen have
been
changed
to their correct
valuesforyour
present position
and
time, pressthe
"ENT"
key.
This sends
the values
you
entered to the GPS module which
should shorten the time
required
for it to find the satellites
and return
your
present position.
If
you
press
the
right
arrow
key again.
Continue
in this manner until
the
route name has been en-
tered.
(Note:
To enter a
space,
press
the
key
next to the "Z
label. The
space
is the charac-
terafterthe
"Z".)
When the name
appears
as
you
wish,
press
the
ENT
key.
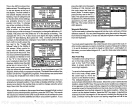
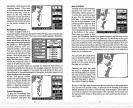
The screen shown at
right appears.
Waypoint
Selection
a
n
Change
Name
(Add
From
Map
Add From
Table)
(Add
From
Keys
SSaSSS4*StSe
Remiowe
IIaypt
Edit
Ilaypt
I
mS—
BIG FISH Route
LEG WAYPT S
-
You're now
ready
to
place
the
waypoints
into the
route,
using any
of three
different methods. You can
place waypoints using
the cursor on the
map,
from the list of
waypoints,
or enter the
latitude/longitude
of each
waypoint
from the
keyboard.
IMPORTANTl
You must select
waypoints
in the order
they
are to be used in the route.
In
otherwords,
suppose you
want a route
that consists of
waypoint
numbers
1, 3,
and 5.
However,
you
wish to travel to 3
first,
then
1,
and
finally
5.
In
this
case, you
must select
waypoint
3, 1,
and 5 in that orderwhen
making
the route.
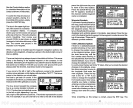
Add From
Map
To create
a route
using
the cur-
sor on the
map, press
the
key
next to
the "Add From
Map"
label.
A screen similar to the
one at
right
appears.
To save the
first
waypoint
loca-
tion
in the
route,
simply press
the arrow
keys
to move the
cursor to the desired
location.
The
latitude/longitude
of the
cursorshows atthe
bottom of the screen. When the cursor is atthe
desired
location,
press
the ENT
key.
This saves the cursor
position
as a
waypoint.
A box
appears
on the screen with the
waypoint's
number
beneath it. Now
move the cursor
to the next location on the route.
As
you
move the
cursor,
a
line stretches from the first
waypoint
to the cursor
position.
When the
cursor
is at the desired
location,
press
the ENT
key again.
A dashed line
extends
from the first
waypoint
to the
second, showing
the first
leg
of the
route. Continue
moving
the cursor and
saving waypoints
until all of the
18
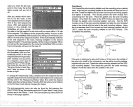
43
ftlUse
arrow
keys
to moue about, PressI
RI
ENT to star tialization
when'
Ifi
you
are done.
CLR will exit screen.
End of }loitte
——
Use arrow
keys
to moue about.
Press'
ENT to start initialization when
you
are done. CLU will exit screen.
lifi
FISH
ROUTE]
-
END OF ROUTE
--
N E-5°42.972
Id
200 14.421'
.IJ5I3O0J
PDF compression, OCR, web-optimization with CVISION's PdfCompressor