


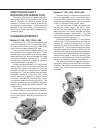

49
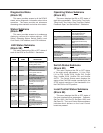
Enabling Torque Functions
STEP 1 - From the HART
®
communicator
“Online” menu, move to the “Torque Setup” menu
and select the “Trq/Thrust” parameter. This is
accomplished by using the up and down arrow
keys to select the appropriate item in each menu
and then moving forward by pressing the right
arrow key. Follow the Menu Tree (Figure 1, page
34) to navigate.
STEP 2 - With the “Trq/Thrust” parameter
selected, press the right arrow key to display the
two entry choices: “Enabled” or “Disabled”. Use
the up and down arrow keys to select the desired
parameter. Enabling this parameter will activate
the torque measurement features and displays,
while disabling the parameter will turn them off.
STEP 3 - With the desired choice selected,
push the F4 function key, which is defi ned as
the ENTER key at the bottom of the display.
Pushing this key enters the selected parameter
and reverts the display back to the “Torque setup”
main menu. Carefully follow the on-screen
warnings and messages to return to normal
operation.
Enabling Over-torque
Protection
STEP 1 - From the HART
®
communicator
“Online” menu, move to the “Torque Setup”
menu, make sure that the “Trq/Thrust” parameter
is enabled (if not, enable it using the prior
procedure) and select the “Ovt Prot” parameter.
This is accomplished by using the up and down
arrow keys to select the appropriate item in each
menu and then moving forward by pressing the
right arrow key. Follow the Menu Tree (Figure 1,
page 34) to navigate.
STEP 2 - With the “Ovt Prot” parameter
selected, press the right arrow key to display the
two entry choices: “Enabled” or “Disabled”. Use
the up and down arrow keys to select the desired
parameter. Enabling this parameter will activate
the over-torque protection, while disabling the
parameter will turn it off.
STEP 3 - With the desired choice selected,
push the F4 function key, which is defined as the
ENTER key at the bottom of the display. Pushing
this key enters the selected parameter and
reverts the display back to the “Torque Setup”
main menu.
STEP 4 - At the bottom of the “Torque Setup”
menu, the F2 function key should now be defined
as the SEND key. Push this key to execute the
change. This change should not effect drive
positioning but as with all configuration changes,
carefully follow the on-screen warnings and
messages when proceeding.