


CJ2A Operation and Care
Manual -- Getting Started
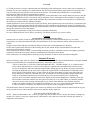
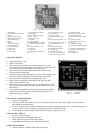
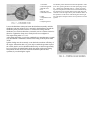
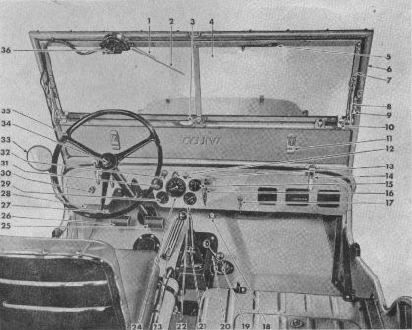
FIG. 1 - VEHICLE CONTROLS
1. Windshield Wiper Arm
2. Windshield Wiper Blade
3. Windshield Centre Lock
4. Windshield Glass
5. Hand Wiper Handle and Knob
6. Windshield Tubular Frame
7. Windshield Frame and Glass Assembly
8. Windshield Inner Adjusting Arm
9. Windshield Outer Adjusting Arm
10. Adjusting Wing Screw
11. Top Bow Storage Retainer
12. Instrument Panel Light
13. Choke Control
14. Windshield Clamp
15. Ammeter
16. Hand Brake Handle
17. Ignition Switch
18. Starter Switch
19. Underdrive Shift Lever
20. Front Axle Drive Shift Lever
21. Transmission Shift Lever
22. Heat Indicator Gsuge
23. Accelerator Pedal
24. Speedometer
25. Brake Pedal
26. Clutch Pedal
27. Headlamp Dimmer Switch
28. Instrument Panel Light Switch
29. Oil Gauge
30. Main Lighting Switch
31. Fuel Gauge
32. Throttle Control
33. Rear Vision Mirror
34. Horn Button
35. Steering Wheel
36. Windshield Wiper Motor
TO MAKE VEHICLE READY.
• Fill the radiator with clean, soft water.
• Put gasoline in the tank.
• Fill the oil reservoir through the filler pipe at the right side of the engine until the oil indicator stick registers “FULL”.
(See “Lubrication Specifications”.)
• Supply all parts requiring lubrication with oil or lubricant.
• See that the tires have proper pressure (See “Tire Pressure”.)
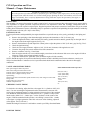
• Adjust the rear view mirror to correct position for driver. If adequate view is not obtainable, the mirror may be
adjusted by loosening the screw through the mounting bracket or by tilting in the ball and socket connection.
CONTROLS AND SWITCHES.
• The position of all controls and switches is shown in Fig. 1.
• The horn is operated by pressing the button located at the top center of the steering wheel.
• The instrument panel light switch is located along the lower edge of the instrument panel to the left of the steering
post. The windshield wiper control is mounted on the wiper motor housing.
• The main light switch No. 30 controlling both the head and tail lamps is conveniently located on the instrument panel
to the left of the steering post. It is of the plunger type – pull all the way out for the “full on” position, half-way for
“parking” and all the way in is the “off” position.
• In addition to the main light switch, the high and low beams of the headlamps are controlled by a selector foot switch,
located on the toe board to the left of the clutch pedal. Pressing and releasing the switch button, with the foot,
alternately changes the beam from high to low and vice versa.
TO START ENGINE.
• Put the transmission gearshift lever No. 21, Fig. 1 in neutral. Place the transfer case low and high shift lever No. 19 in
direct gear or in the rear position and disengage the front axle by placing the shift lever No. 29 in the forward
position.
• Pull the choke control button No. 13 one-fourth of the way out which also opens the throttle slightly.
• Place the key in ignition lock No. 17 and turn it to the right, closing the ignition circuit.
• Disengage the clutch.
• Depress the foot starting switch at No. 18.
• Should the engine fail to start at once, pull the choke all the way out and press the starting switch. When the engine
starts, push the choke in about one-third of the way.
• Set the choke control at the best operating position and as the engine warms up, push the choke all the way in. Do not
run with the choke out as fuel is wasted and the engine fouled.
• Should the engine fail to start, see the “Emergency Chart”.