


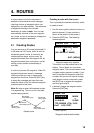
3. WAYPOINTS (MARKS)
15
5. The cursor is selecting “NEW?”; press the
[ENT] key.
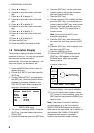
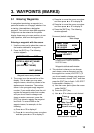
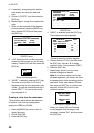
ENTER A NEW WPT NAME.
0 0 4_ _ _?
(004:DEFAULT NAME)
Quit: [MENU]
Waypoint name entry window
6. Enter name (if desired) with the cursor
pad and then press the [ENT] key.
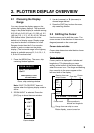
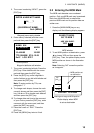
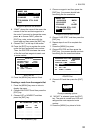
NAME: 004
34°39.836'N* MARK
135°12.059'E* x
10-JAN-02 10:25D
TTG 02H00M ETA: 12:25
Exit? LOG RTE?
* Current position
Waypoint attribute edit window
7. The cursor is selecting latitude. Press the
[ENT] key. Enter latitude with the cursor
pad and then press the [ENT] key.
8. Press the [ENT] key, enter longitude in
similar fashion as you did with latitude and
then press the [ENT] key.
Note: To enter position by TDs, see
paragraph 7.7.
9. To change mark shape, choose the mark
currently shown and then press the [ENT]
key. Use ▲ or ▼ to choose mark desired
and then press the [ENT] key.
10. To change date and time to the comment
of your choice, press the [ENT] key, enter
comment with the cursor pad, and then
press the [ENT] key again.
11. Place the cursor on “Exit?.” Press the
[ENT] key.
12. Press the [MENU] key twice to finish.
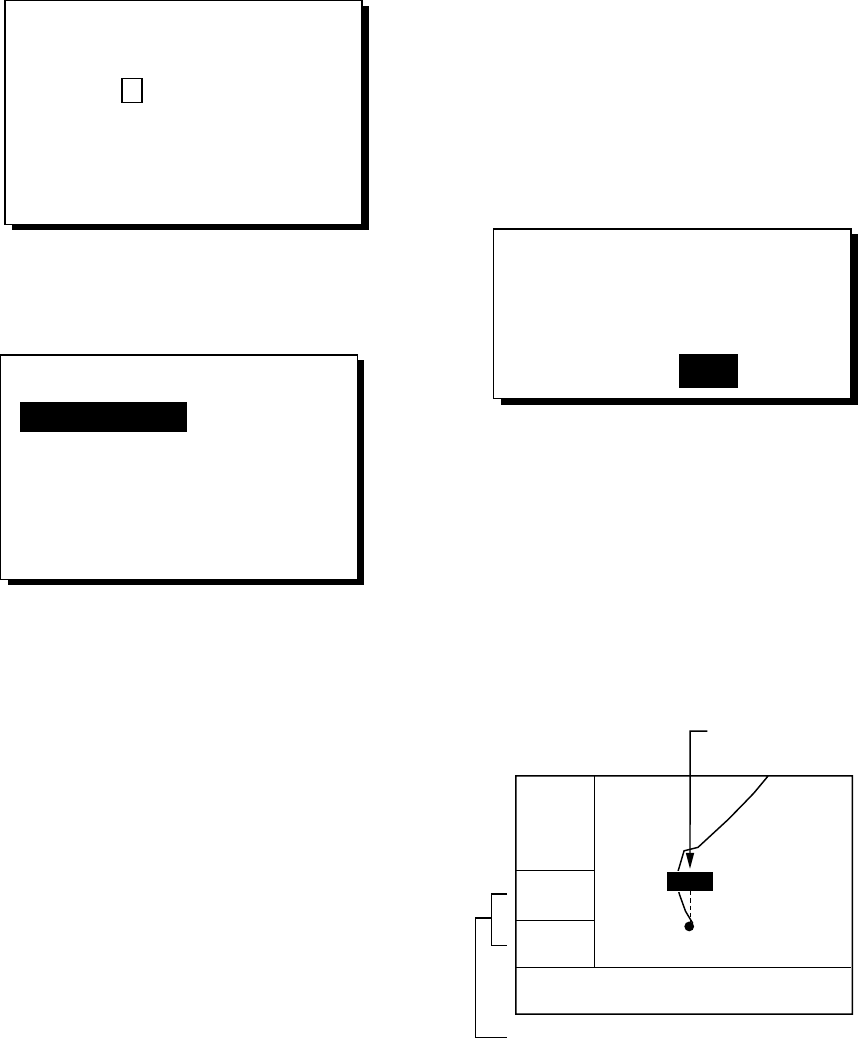
3.2 Entering the MOB Mark
The MOB mark denotes man overboard
position. Only one MOB mark may be entered.
Each time the MOB mark is entered the
previous MOB mark and its position data are
written over.
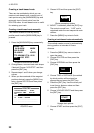
1. Press the [MARK/MOB] key on any
display until the following display appears.
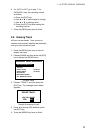
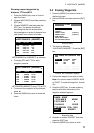
SAVED TO MOB.
GO TO MOB ?
ARE YOU SURE?
YES NO
MOB window
2. To set MOB position as destination, press
◄ to choose YES and then press the
[ENT] key. Then, the plotter display marks
MOB position as shown in the illustration
below.
Note: Selecting “NO” saves the position
as a waypoint.
D2D
[ 40
]
n
m
1°
0.06
n
m
34°44.000N 135°21.000E
BRG:
RNG:
MOB
MOB position set
as destination
Bearing and range to MOB position
Plotter display when MOB
is set as destination