


-
2
.
3-
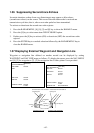
2.3 ARPA Menu Operation
To activate ARPA function;
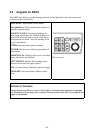
1. Press the RADAR MENU key.
2. Press [8] key to select ARPA, instead of EPA.
Note that the label ARPA appears in the upper-right box on the screen.
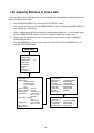
Various parameters for the ARPA are set on the ARPA 1 and ARPA 2 menus. To do this,
follow the steps shown below:
1. Press the PLOT MENU key to show the ARPA 1 menu.
2. Press the [0] key once if you wish to go to the ARPA 2 menu.
3. Select a desired menu item by pressing the corresponding numeric key.
4. Select a menu option by pressing the same numeric key as pressed in step 3 above. If there
is more than one option on the current menu item, you may need to press the numeric key
several times. Press it until the desired option is highlighted. (Note that certain menu items
will prompt you to enter numeric data or to define points on the radar screen with the
trackball.)
5. Press the ENTER key to register settings.
6. Press the PLOT MENU key to close the menu.
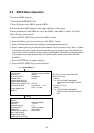
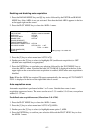
Press [PLOT MENU] key.
[ARPA 1]
1 VECTOR TIME 30SEC/1/2/3/6/12/15/30MIN
2 AUTO ACQ OFF/ON
3 AUTO ACQ AREA 3.6NM/[SET] *
4 GUARD ZONE OFF/ON
5 [GUARD ZONE SET] **]
6 TARGET BASED SPEED
7 REFERENCE TARGET VECT OFF/ON
8 COLLISION ALARM OFF/ON CPA x.xKT
TCPA xx.xMIN
9 [TRIAL MANEUVER]
0 [ARPA 2]
* SET opens the [AUTO ACQ AREA SET]
submenu which reads:
1 [ARPA1]
2 1/2 SET LEFT/RIGHT BOUNDARY
CANCEL PREVIOUS AREA: CANCEL
KEY
** This submenu reads:
1 [ARPA 1]
2 1/2 SET LEFT/RIGHT BOUNDARY
CANCEL PREVIOUS AREA: CANCEL
KEY
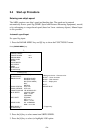
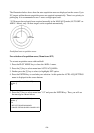
Press [0].
[ARPA 2]
1 [ARPA 1]
2 TRIAL MODE STATIC/DYNAMIC
3 HISTORY OFF/ON
4 HISTORY POINTS 5/10
5 HISTORY INTVL 30SEC/1/2/3/6MIN
6 MARK SIZE STD/LARGE
7 GUARD, ACQ STABILIZE NORTH/CRT
8 [INPUT SIG CHECK]
9 [ARPA TRACK TEST]
0 [ARPA INITIAL SETTING]