


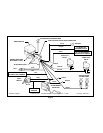
4. WHITE Loop Wire
This wire exits the rubber boot, and immediately loops back into the
rubberboot.
Three minutes after the alarm has been armed, thevoltage sensing
circuitrybecomesactive.Thisvoltagesensingmonitorsthevoltagelevel
ofthe vehicle,andwhenit seesachange (i.e. adoor opens,andthe
interior lightturnson ),thealarm istriggered.
Manyvehiclesincorporateanelectroniccoolingfan,whichwillautomati-
callyswitchonafterthevehiclehasbeenturnedoff.Ifthisfanswitches
onshortlyafterthealarmhasbeenarmed,thesystemwillnottriggerdue
tothe threeminute delay.
If yourvehicle doesnothave anelectronic coolingfan whichturns on
afterthevehiclehasbeenturnedoff,youmayelecttobypassthethree
minute arming delayof the voltage sensecircuit. The system canbe
modifiedsothatsixsecondsafterarming,thevoltagesensingcircuitry
becomes active. The three minute time delay can be eliminated by
cutting the WHITE wire loop. After cutting the WHITE wire loop,
individuallyinsulate bothendsofthe wirewithelectricaltape.
Donotcutthisloopifyourvehicleisequippedwithanelectroniccooling
fan,as youwillexperience falsealarms.
5. GREEN Loop Wire
This wire exits the rubber boot, and immediately loops back into the
rubberboot.
Cuttingthiswirewilleliminatethevoltagesensingfeatureofthealarm.
When thiswireis cut,opening thedoorswill nottriggerthe system.
Thisloopwireshouldbecutonlyifyouwanttoprotectthevehiclefrom
suddenimpactstotheglass orbodypanels, butdonot wantthealarm
totrigger whena doorhasbeenopened.
6. Final Touches
Ifthere areanywires fromthemain harnessthatyoudid notconnect,
simply because you did not wish toactivate a particular feature, you
shouldeitherinsulatetheendsofthesewireswithelectricaltapeandtie
them where theycannot be damaged, or simplyremove any unused
wiresfrom themainharness connector.
ADJUSTING THESENSITIVITY OF THESHOCK SENSOR
The purpose of a shock detector is to “sense” strong impacts to the
vehicle’sglassand bodypanels,butignorelightbumps tothe vehicle.
This alarmisprogrammed toreport theseimpactsin twoways.
Alighterimpactwillcausethealarmtosoundaseriesofshort“chirps”,
warninganyone tamperingwiththevehicleto stopimmediately.
Amoreforcefulimpactwillcausethealarmtosoundforit’sfull60second
cycle,informing youthat aseriousviolation attempthasoccurred.
IMPORTANT !Settingthe sensitivityofthe shocksensortoo highwill
causefalsealarms.Asubstantialamountofforceisrequiredtoactually
break automotive glass,and the shock sensorshould be set accord-
ingly.
Before proceeding with the adjustment, make sure that all screws
securing the siren control module to the bracket, and securing the
bracketto thevehicle,are securelytightened.
To adjustthe shock sensor;
A. Locate andremove the small rubberplug on theback of the siren
controlmodule.
B. Gently turn the adjustment screw fully counter - clockwise, then
clockwiseapproximately1/8ofaturn.Donotoverturnthisscrew,as
maximumrotation isapproximately270º. Youshouldstopapplying
pressure assoonas youfeela slightamount ofresistance.
C.Closethehood,armthealarm (ARMEDor“1CHIRP “),andallow
six secondsfor theshock sensortostabilize.
D.Firmlystrikethefrontbumperofthevehiclewiththesideofaclosed
fist,considering theamountof forcerequiredto breakawindow.
CAUTION!Never performthistest onthe vehicle’sglass, asyoumay
breakawindow.
E.Ifthealarmdidnotsound,orifonlythewarningchirpswereactivated,
thenthesensitivitywillneedtobeincreased.Disarmthealarm,and
openthe hoodtogain accesstothe sirencontrolmodule.
F.Gentlyturntheadjustmentscrewapproximately1/8turnclockwise(
increasing sensitivity),and repeatthe test.
G.Repeatthisprocedure untilafirmstrikecausesthealarm totrigger,
and a less forceful impact causesthe alarm to sound the warning
chirps.
H.When theadjustmentis set,replacethe rubberplugonthe backof
thesirenmodule.
ADJUSTING THE SENSITIVITY OF THE GLASS BREAK
DETECTOR
Thealarmdoesnotneedtobearmed whenadjustingthesensitivity of
this sensor. Simply observe the red L.E.D.on themicrophone while
makingthe adjustments.
A. Gently turn the adjustment screw counterclockwise until a slight
resistance isfelt, thenturnit clockwiseabout 1/4rotation.
B.ObservetheL.E.D.,movetotheinsiderearofthevehicle,andfirmly
clap yourhandstwo quicktimes.
C.If theL.E.D. turnedon briefly,no furtheradjustment isnecessary.
D.IftheL.E.D.didnotturnon,gentlyturntheadjustmentscrewanother
1/8 rotation clockwise, and repeat the test. Continue until the
adjustmentis properlyset.
IMPORTANT!Donotsetthesensitivitytoohigh,asdoingsowillcause
false alarms created by noises outside the vehicle. The sensitivity
should be set to detect the loud sound of breaking glass within the
automobile.
OPERATING THE SYSTEM
Inthissection,theoperationofthesystemisdescribedaccordingtothe
voicemessagesthatareprogrammedintothesirencontrolmodule.The
equivalent chirp tones are shown in parenthesis for thoseusers that
havedisabled thevoice( seebluewireloop ).
1. Arming the System
A. Exitthevehicle, andclose andlockall doors.
B.Pressandreleasethelargerarmingbuttononthekeychaintransmit-
ter.The systemwillrespond with“ARMED”( onesinglechirp), and
theparking lightswillflash onetime.
C.The reddashmounted L.E.D.willbegin toflash,and afterapproxi-
matelysix seconds,the shocksensingfeatureofthe systemwillbe
activated. Thevoltagesensing circuitwill beginitscountdown, and
afterapproximatelythreeminutes,openingalightactivateddoorwill
triggerthe alarm.
D.Ifthesystemhasbeeninstalledusingtheautomaticpassivearming
feature,then60secondsafterswitchingtheignitionkeyoff,thealarm
will automaticallyarmproviding thehood andtrunklids areclosed.
During the 60 second automatic arming cycle, the dash mounted
L.E.D. willflashrapidly.
IMPORTANT !If the WHITE loopwire was cutduring the installation
procedure,thevoltagesensingfeatureofthealarmwillbecomeactive
sixsecondsafterarmingthesystem(seeCOMPLETINGTHEINSTAL-
LATION, WHITELoopWire).Youwillnotneedtowaitthethreeminutes
beforeopening adoorwillcause thealarmtotrigger.
Page 7