


Garmin G1000 Cockpit Reference Guide for the Mooney M20M, M20R, & M20TN
8-7
SECTION 8 – FLIGHT PLANNING
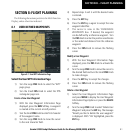
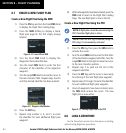
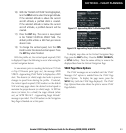
Figure 8-15 Trip Planning Page
Starting WPT Ending WPT
4) For Direct-to planning, press the
WPTS
Softkey and verify that the starting waypoint
field indicates ‘P.POS’ (present position). If
necessary, press the
MENU
Key and select ‘Set
WPT to Present Position’ to display ‘P.POS’.
Press the
ENT
Key and the flashing cursor
moves to the ending waypoint field. Turn the
FMS
Knob to enter the identifier of the ending
waypoint and press the
ENT
Key to accept the
waypoint. OR,
5) For point-to-point planning, turn the
FMS
Knob
to enter the identifier of the starting waypoint.
Once the waypoints identifier is entered, press
the
ENT
Key to accept the waypoint. The
flashing cursor moves to the ending waypoint.
Again, turn the
FMS
Knob to enter the identifier
of the ending waypoint and press the
ENT
Key
to accept the waypoint. OR,
6) For flight plan leg planning, press the
FPL
Softkey
(at the bottom of the display) and turn the
Small
FMS
Knob to select the desired flight plan
(already stored in memory), by number. Turn the
Large
FMS
Knob to highlight the ‘LEG’ field and
turn the Small
FMS
Knob to select the desired leg
of the flight plan, or select ‘CUM’ to apply trip
planning calculations to the entire flight plan.
Selecting ‘FPL 00’ will display an active flight
plan. If an active flight plan is selected, ‘REM’
will be an available option to display planning
data for the remainder of the flight plan.
NOTE: The Page mode must be set to MANUAL
to perform the following steps.
7) Turn the Large
FMS
Knob to highlight the
departure time (DEP TIME) field.
NOTE: The Departure Time on the Trip Planning
Page is used for preflight planning. Refer to the
Utility Page for the actual flight departure time.
8) Turn the
FMS
Knob to enter the departure time.
Press the
ENT
Key when finished. (Departure
time may be entered in local or UTC time,
depending upon system settings).
9) Turn the
FMS
Knob to enter the fuel flow.
Press the
ENT
Key when finished. Note that
in Automatic Page Mode, fuel flow is provided
by the system.
10) The flashing cursor moves to the fuel on board
field. Turn the
FMS
Knob to modify the fuel on
board. Press the
ENT
Key when finished. In
‘AUTOMATIC’ mode, fuel onboard is provided
by the entry made in ‘GAL REM’ on the EIS
System Page.
11) The flashing cursor moves to the calibrated
airspeed field. Turn the
FMS
Knob to enter a
calibrated airspeed. Press the
ENT
Key when
finished.