


Garmin G1000 Cockpit Reference Guide for the Mooney M20M & M20R
10-2
SECTION 10 – HAZARD
AVOIDANCE
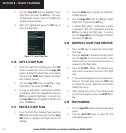
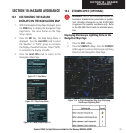
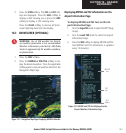
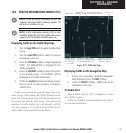
At a map range of less than 25 nm, Stormscope light-
ning data is not displayed, but can still be present. The
presence of Stormscope lightning data is indicated by the
annunciation ‘LTNG < 25 nm’ in the upper right corner.
Figure 10-5 Lightning Display Range Annunciation
To select ‘cell’ or ‘strike’ as the Stormscope
lightning mode:
1. With the Weather Group selected, press the
ENT
key. The cursor flashes on ‘STRMSCP
LTNG’.
2. Turn the
large FMS
knob to select ‘STRMSCP
MODE’.
3. Turn either
FMS
knob to display the ‘Cell/Strike’
window.
4. Turn either
FMS
knob to select ‘Cell’ or ‘Strike’.
Press the
ENT
key.
5. Push the
FMS
knob to return to the Navigation
Map Page.
To clear Stormscope lightning data from
the Navigation Map Page:
1. Press the
MENU
key (with the Navigation Map
Page displayed).
2. Turn either
FMS
knob to highlight the ‘Clear
Lightning Data’ field and press the
ENT
key.
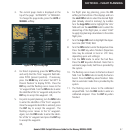
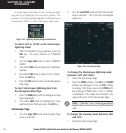
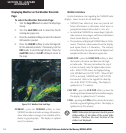
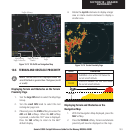
Stormscope Page
1. Turn the
large FMS
knob until the Map Page
group is selected.
2. Turn the
small FMS
knob until the Stormscope
Page is selected. This is the third rectangular
page icon.
Figure 10-6 Stormscope Page
To change the Stormscope lightning mode
between ‘cell’ and ‘strike’:
1. Select the Stormscope Page.
2. Press the
MODE
softkey. The
CELL
and
STRIKE
softkeys are displayed. Press the
CELL
softkey
to display ‘CELL’ data or press the
STRIKE
soft-
key to display ‘STRIKE’ data. ‘CELL’ or ‘STRIKE’
is displayed in the mode box located in the
upper left corner of the Stormscope Page.
NOTE: “Cell mode” uses a clustering program to
identify clusters of electrical activity that indicate
cells.
To change the viewing mode between 360
˚
and 120˚:
1. Select the Stormscope Page.