


2 Quest Owner’s Manual
UNIT OVERVIEW > A TUTORIAL
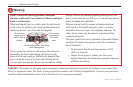
A Tutorial
This tutorial guides you through the steps for finding a restaurant in
your area and then creating a route to it.
If you have a Quest (not a Quest 2), you need to first load detailed
maps onto your Quest. Refer to the setup guide in the DVD-ROM
case. The Quest 2 has map data loaded already; you do not need to
load additional data on the Quest 2.
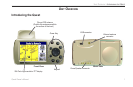
Step 1: Flip up the antenna and snap your Quest into the vehicle
suction mount. Plug the cable end of the 12-Volt adapter into
your vehicle’s cigarette lighter. See page 4 if you need additional
instructions.
Turn on the Quest. Make certain the antenna is unobstructed as it
looks for satellites. For example, it cannot establish a satellite fix if
your vehicle is parked in a garage. Position the antenna so that it
is parallel to the surface of
the road for optimal signal
reception.
When your Quest has
established a satellite fix,
it displays a “Ready to
Navigate” message.
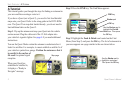
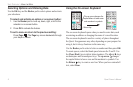
Step 2: Press the FIND key. The Find Menu appears.
FIND key
Use the Rocker pad to
highlight the Food &
Drink icon. Then press
the OK key.
Rocker pad
OK key
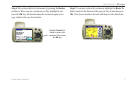
Step 3: Highlight the Food & Drink icon located on the Find
Menu (from Step 2) and press the OK key. The list of restaurants in
your area appears on a page similar to the one shown below.
Use the Rocker pad to
highlight a restaurant.
Then press the OK key.
Map page