


3. PLOTTER OPERATION
3-45
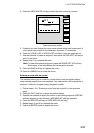
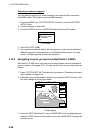
Navigating to multiple quick points
1. Select “35 POINTS” following the procedure in “Selecting quick point entry
method” on the previous page.
2. Press the GOTO soft key.
3. Place the cursor on an existing waypoint (SELECT WPT soft key appears) or
a new location (ADD QP soft key appears).
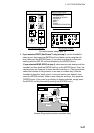
4. Depending on the action taken at step 3, press the SELECT WPT or ADD
QP soft key. “QP<01>” appears at the cursor location if a quick point is
selected. To erase last-entered quick point (waypoint), press the ERASE LST
QP (ERASE LST WP) soft key.
5. Repeat steps 3 and 4 to complete the route.
6. Push the [ENTER] knob to finish.
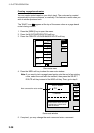
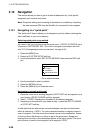
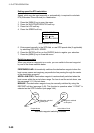
A solid light-blue line with arrows connects between own ship and the first point
and all other points are connected with a green dashed line with arrows. Arrows
on the line show the direction to follow to get to your destination. Quick points
are numbered in sequential order from QP<01> and are saved to the waypoint
list. Range and bearing from own ship to the first destination appear at the top of
screen. The quick points are saved as a route, under the name “Q>RTE” (Quick
Route).
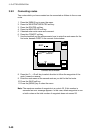
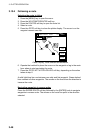
3.10.2 Navigating to waypoints
Selecting a waypoint from the plotter display
1. Operate the trackball to select a waypoint.
2. Press the GOTO WPT soft key.
Note: GOTO method should be selected to “1 POINT” on the PLOTTER SETUP
menu.
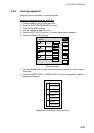
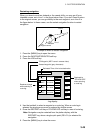
Selecting a waypoint from the waypoint list
1. Press the [MENU] key to open the menu.
2. Press the WAYPOINTS/ROUTES soft key.
3. Press the WAYPOINTS soft key to open the waypoint menu.
4. Press the LOCAL LIST or ALPHANUMERIC LIST soft key as desired.
5. Use the trackball to select a waypoint.
6. Press the GOTO soft key, and the plotter display appears.
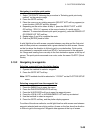
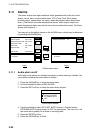
For either of the above methods, a solid light-blue line with arrows runs between
waypoint selected and own ship’s position. Arrows on the line show the direction
to follow to get to the waypoint. Waypoint data appears at the top of screen.