


16
power them on, and select the route they plan to use for navigation.
1. Press MENU, highlight the Routes option, and press ENTER.
2. Highlight the route and press ENTER. The map displays.
3. Highlight the Navigate button and press ENTER. The map displays.
4. Press MENU, highlight the Tracks option, and press ENTER.
5. Ensure the On button is activated. If it is not, highlight the On button and press ENTER to
activate it.
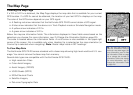
6. To view the location in real time, press QUIT to display the Map Page.
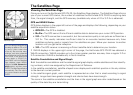
The GPS device not only tells them where they are in real time but also keeps a record (track) of
everywhere they’ve been. Once they’ve finished the trail, they decide to save the track so that they
can see where they’ve ridden.
7. Press MENU, highlight the Tracks option, and press ENTER.
8. Highlight the Save button and press ENTER.
Since they might want to visit this track again later, they decide to name the track with the trail name
and assign it the same color that they assign all of the trails they’ve ridden. They also use the com-
ments feature in the Tracks screen to note if they thought the trail was easy, moderate, or difficult.
9. Highlight the Track text field and press ENTER to name the track “GW Forest” using the key
board. Then, highlight OK and press ENTER.
10. Highlight the Color block and press ENTER. Use the arrow keypad to highlight the color blue
and press ENTER.
11. Highlight the Comment text field, press ENTER, and assign a difficulty comment using the
keyboard. Then, highlight OK and press ENTER.
12. Highlight the View button and press ENTER to see a snapshot of where you went on the trail.
When they arrive home, they download the track and waypoint information into their DeLorme soft-
ware so they can see a larger view of where they were. They finish by saving the track information in
their mountain biking library project.
Editingtrackdetails
Navigatingaroute