


75
MAINTENANCE
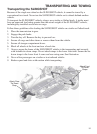
Auxiliary Headlamp Aim Adjustment (USA)
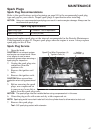
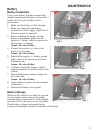
1. Verify that headlamp aim inspection
conditions are met. See page 74.
2. Position the vehicle on a level surface
with the nose 5 ft. (1.5 m) from a wall.
3. Move the ignition switch to the ON
position to turn the lights on.
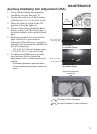
4. Observe the auxiliary headlight beam
display on the wall. The lower edge of
the beam displays with a multi-colored
halo.
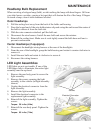
5. Measure from the floor to the bottom
edge of the halo’s green band as
illustrated. When the beam is properly
adjusted, this measurement should be in
the following range:
• 3.75-5.75” (9.5-14.6 cm) for base model
• 4.75-6.75” (12-17.1 cm) for SL model
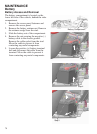
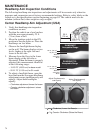
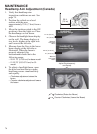
6. To adjust a headlight beam, open the
hood and turn the two headlamp
adjustment screws simultaneously and
equally.
• Clockwise adjustment raises the beam
• Counter-clockwise adjustment lowers the
beam
5 ft.
(1.5 m)
5.75” (14.6 cm)
3.75” (9.5 cm)
6.75” (17.1 cm)
4.75” (12 cm)
SLINGSHOT
Acceptable Range
SLINGSHOT SL
Acceptable Range
Adjust Simultaneously
and Equally
Clockwise (Raise the Beam)
Counter-Clockwise (Lower the Beam)