


74
MAINTENANCE
Headlamp Aim Inspection Conditions
The following headlamp aim inspections and adjustments will be accurate only when tire
pressures and suspensions are at factory-recommended settings. Refer to safety labels on the
vehicle or to the specifications section beginning on page 84. The vehicle must also be
unladen (without fuel, rider weight or cargo weight).
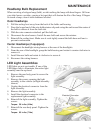
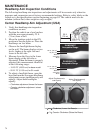
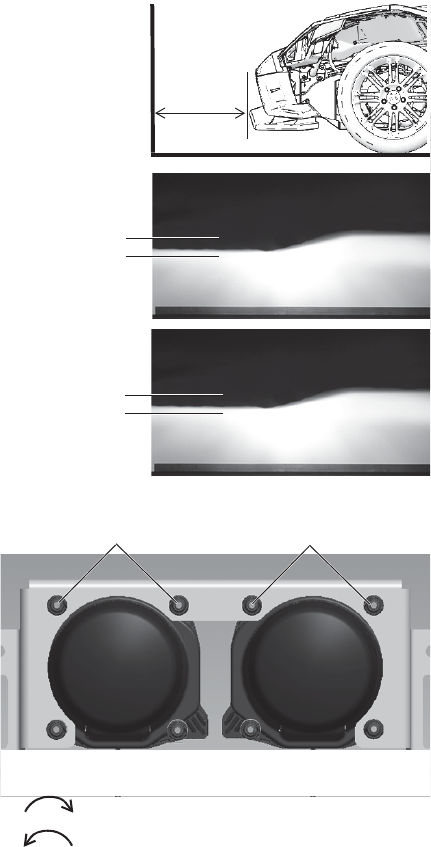
Center Headlamp Aim Adjustment (USA)
1. Verify that headlamp aim inspection
conditions are met.
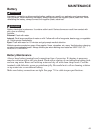
2. Position the vehicle on a level surface
with the nose approximately 25 ft.
(7.6 m) from a wall.
3. Move the ignition switch to the ON
position to turn the lights on. Place the
headlamps on low beam.
4. Observe the headlight beam display
on the wall. The beam displays at two
levels, higher at the right side and
lower at the left side.
5. Measure from the floor to the lower
beam display at the left side as
illustrated. When the beam is properly
adjusted, this measurement should be
in the following range:
• 19-20.75” (48-53 cm) for base model
• 20-21.75” (51-55 cm) for SL model
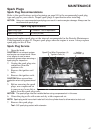
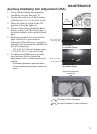
6. To adjust a headlight beam, open the
hood and turn the two upper headlamp
adjustment screws simultaneously and
equally. Adjust both headlights
equally.
• Clockwise adjustment lowers the beam
• Counter-clockwise adjustment raises
the beam
Adjust Simultaneously
and Equally
Adjust Simultaneously
and Equally
Clockwise (Lower the Beam)
Counter-Clockwise (Raise the Beam)
20.75” (53 cm)
19” (48 cm)
21.75” (55 cm)
20” (51cm)
SLINGSHOT SL
Acceptable Range
SLINGSHOT
Acceptable Range
25 ft.
(7.6 m)
Measure
Left Lower
Beam
Measure
Left Lower
Beam