


55
FC-21 Flow Computer
8.3 Internal Fuse Replacement
Instructions:
1. Make sure you follow proper E.S.D. Precautions. All persons performing this
replacement must follow proper grounding procedures.
2. Turn the power to the unit off.
3. Disconnect the two piece connector rear terminal block, leaving all connections in place.
4. Remove the unit from the panel.
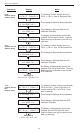
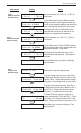
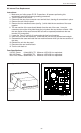
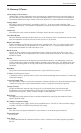
5. Remove the four machine screws (see fig. 1) which hold the two sections of the case
together.
6. The rear section of the case should detach from the rest of the case. It may be
necessary two cut the wiring label along the joint where the two sections connect. With
the rear section of the case removed the fuse will be exposed (located near the rear
terminal, AC connection).
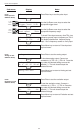
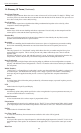
7. Locate the Fuse F1 (see fig. 2) and unplug the fuse from its socket.
8. Insert the new fuse into the socket. Insure that the pins are fully inserted and straight.
9. Reassemble the case and install the four machine screws which join the two sections of
the case.
10.Reinstall the unit into the panel.
11. Reconnect the rear terminal block.
12.Turn the unit back on.
Fuse Specifications:
110 VAC Power: 160mA/250V, TD Wickman 19372-030-k or equivalent
220 VAC Power: 80mA/250V, TD Wickman 19372-026-k or equivalent
12/24 VDC Power: 800mA/250V, TD Wickman 19374-046-k or equivalent
Screws
(4 places)
fig. 1 fig. 2
FUSE
fuse