


2. PLOTTER OPERATION
2-18
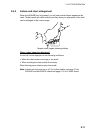
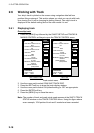
2.6 Working with Track
Your ship’s track is plotted on the screen using navigation data fed from
position-fixing equipment. This section shows you what you can do with track,
from turning it on or off to changing its plotting interval. Own ship’s track is
displayed in the default setting and on the color model it is red.
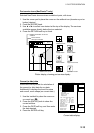
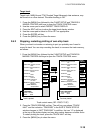
2.6.1 Displaying track
Own ship track
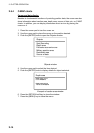
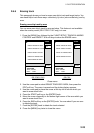
1. Press the [MENU] key followed by the CHART SETUP and TRACKS &
MARKS CONTROL soft keys to open the TRACK CONTROL menu.
OWN SHIP TRACK DISP
ON
TARGET TRACK DISPLAY
ON
INTERVAL
TIME
TIME INTERVAL
10m00s
DISTANCE INTERVAL
00.10nm
OWN SHIP TRACK DISP
ON
OWN SHIP TRACK COLOR
RED
TARGET TRACK DISPLAY
ON
TARGET TRACK COLOR
WHITE
INTERVAL
TIME
TIME INTERVAL
10m00s
DISTANCE INTERVAL
00.10nm
MEMORY(TRACK & MARK)
2000PTS
(MARK MEMORY)
(6000)POINTS
GD-1700GD-1700C/1710C
TRACK
CONTROL
EDIT
ERASE
T & M
MARK
SETUP
RETURN
TRACK
RESUME
EDIT
ERASE
T & M
MARK
SETUP
RETURN
TRACK
RESUME
TRACK
CONTROL
MEMORY(TRACK & MARK)
2000PTS
(MARK MEMORY)
(6000)POINTS
SHIP’S TRACK STATUS
TRACKING
TRACK: 1234/2000
MARK : 9/6000
SHIP’S TRACK STATUS
TRACKING
TRACK: 1234/2000
MARK : 9/6000
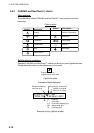
Track control menu
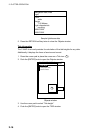
2. Use the cursor pad to select OWN SHIP TRACK DISP.
3. Press the EDIT soft key to show the track display window.
4. Use the cursor pad to select ON (default setting) or OFF as appropriate.
5. Press the ENTER soft key.
6. Press the [MENU] key to close the menu.
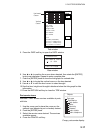
Note: The number of track and mark points used appears at the SHIP’S TRACK
STATUS window on the TRACK CONTROL menu. Using the figure above
as an example, 1234 points of track and 9 marks have been recorded.