


3. ARP OPERATION
3-24
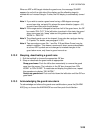
3.13 Setting a Guard Zone
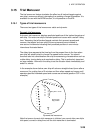
When a target transits the operator-set guard zone, the buzzer sounds and the
indication GUARD appears (in red) at the screen bottom. The target causing the
warning is clearly indicated with an inverted flashing triangle. The guard zone
also functions as an automatic acquisition area when automatic acquisition is
active. Any targets entering the zone will be automatically acquired.
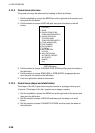
3.13.1 Activating the guard zone
One or two guard zones may be selected. The No. 1 guard zone is available
between 3 and 6 nm and No. 2 guard zone can be set anywhere when the No. 1
zone is already in use. The ARP/AIS guard zone’s lines are white and dashed so
as to distinguish them from the radar guard alarm.
The procedure below shows how to set a guard zone, using the example at the
bottom of the page.
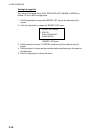
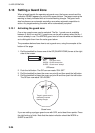
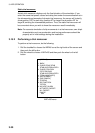
1. Roll the trackball to choose one of the GZ (GUARD ZONE) boxes at the right
side of the screen.
GZ 1
GZ 2
Guard zone status
Blank: GZ off
SET: Set guard zone
WORK: Guard zone active
SLEEP: Guard zone "asleep"
GZ boxes
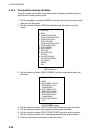
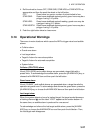
2. Push the left button. The GZ box now reads “GZx SET.”
3. Roll the trackball to place the cursor on point A and then push the left button.
4. Roll the trackball to place the cursor on point B and then push the left button.
The GZ box now reads “GZx WORK.”
A
B
0.5-1 nm
Target in guard zone is
marked by inverted
flashing triangle.
Guard zone
If you are setting a polygon guard zone with GZ2, set at least three points. Press
the right button to finish. Note that the status indication should be WORK or
SLEEP to set GZ2.