


11
Introduction
Features/Data Entry
Features and Data Entry
The following features and data entry procedures are referred to throughout this manual.
Cursor— A highlighted area on the screen which can be moved up/down/left/right with the
ROCKER KEYPAD to select individual fi elds on the display. Moving the cursor to a given location
allows you to begin data entry or scroll through a list.
Field— The location on a page where a group of characters or an option is entered and displayed.
The cursor is placed on a fi eld (using the ROCKER KEYPAD) to begin data entry or selection of
options.
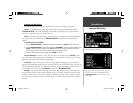
To enter data in a data fi eld:
1. Use the ROCKER KEYPAD to highlight the desired data fi eld. Press ENTER to begin data entry.
2. Use the ROCKER KEYPAD to enter the desired data. UP/DOWN to select the desired character and
RIGHT to move to the next character fi eld. LEFT allows you to back up to the previous character
fi eld or, when at the left most character fi eld, to clear the entire data fi eld.
3. Once the desired data has been entered, press ENTER to confi rm.
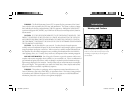
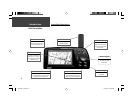
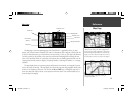
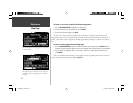
On-Screen Button— Similar to “Field”. Place the cursor on a button and press ENTER to select
the action corresponding to that button. An example of an on-screen button is the ‘Route to It’ button
appearing at the bottom of the Waypoint Marked page.
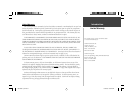
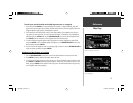
Scroll Bar— When viewing a list of items too long to display on a single page, a scroll bar will
appear along the right-hand side of the list. The position of the scroll bar indicates which portion of the
list is currently being displayed. The height of the scroll bar indicates the number of items in the list. To
scroll through a list of items, use the UP/DOWN portion of the ROCKER KEYPAD.
Default— A system-selected format, built into the operating software or the unit’s memory, that
will be followed unless the user chooses a different setting. For example, the default setting for speed
readings is ‘miles per hour’ or but can be changed to ‘kilometers per hour’. Once a setting is changed,
the new setting is retained until another change is made or a ‘Restore Original Settings’ menu option is
selected.
An example of an on-screen “button”—the ‘Route to It’
button on the Waypoint Marked page.
When viewing a list of items too long to display on a
single page, a scroll bar will appear along the right-hand
side of the list. Also, using the LEFT/RIGHT portion of
the ROCKER KEYPAD will scroll information one full
screen at a time.
190-00256-10_0B.indd 11 1/13/2003, 10:33:39 AM