


10
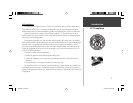
Battery Installation
The StreetPilot III uses six (6) AA batteries, which are installed at the back of the unit. Alkaline,
rechargeable, Lithium, or Ni-Cad batteries can be used. Battery life will vary due to a variety of
factors, including surrounding temperature and the use of backlighting. You may fi nd that Lithium
batteries provide longer life in colder conditions. Saved information will not be lost when you replace
the batteries.
WARNING: It is very important to install ALL batteries with the proper polarity, positive (+)
or negative (-), orientation as indicated in the unit’s battery compartment. Batteries can
leak and cause personal injury and property damage if you install them incorrectly.
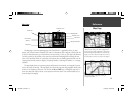
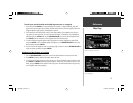
A power symbol (electrical plug) appears at the bottom of the Main Menu and in the upper left
hand corner of the Trip Information page (see pages 12 and 36) when the unit is running on external
power. When the unit is running on AA batteries, instead of the power symbol a green battery strength
bar indicator appears (see page 42). The bar shortens as the unit uses battery power. To conserve
battery life you can switch to Battery Saver mode (see page 43, under ‘GPS Mode’) or you can use the
Vehicle Power Cable.
When the battery power falls below a certain level, the bar indicator turns red. You should replace
the batteries when this occurs. In addition, a ‘battery voltage is low’ message appears at the bottom
of the page.
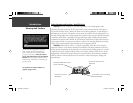
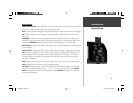
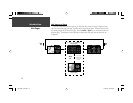
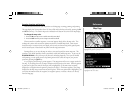
To install the batteries:
1. Lift up the metal D-ring at the back of the unit and turn it ¼ turn counterclockwise to open the
compartment door.
2. Install the batteries (as shown at left and as marked in the battery compartment).
3. Turn the D-ring ¼ turn clockwise to lock the door in place.
Introduction
Installing the Batteries
,
• Observe correct polarity when installing batteries.
• Replace all batteries at the same time.
• Do NOT mix new and used batteries.
• Do NOT mix Alkaline batteries with Lithium or
Ni-Cad rechargeable batteries.
Immediately after you install new batteries, turn the unit
on to ensure that the unit’s battery strength indicator
displays a fully-charged battery condition.
If the unit does not turn on or the battery level indicator
displays a partially charged battery condition, recheck
for proper battery installation. If, after checking installa-
tion, the battery level indicator continues to indicate a
partially charged condition, the newly installed batteries
may be depleted from long-term storage. Replace with
fresh batteries.
190-00256-10_0B.indd 10 1/13/2003, 10:33:36 AM