


Chapter 5: Installing the ST4000+ 63
5 Installing the ST4000+
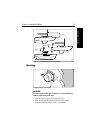
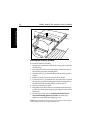
Tiller brackets
If the tiller is higher or lower than the mounting socket, you can use a
Raymarine tiller bracket to vary the tiller pin offset so the drive is
horizontal.
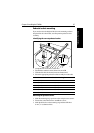
Identifying the correct tiller bracket
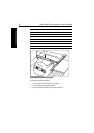
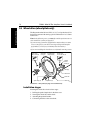
1. Clamp the tiller on the boat’s center line.
2. Measure dimension D (if the pushrod is above the tiller) or
dimension E (if the pushrod is below the tiller).
3. Select the appropriate bracket from the following table:
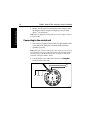
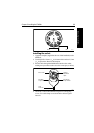
Mounting the tiller bracket
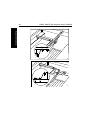
1. Position the tiller bracket on the center line of the tiller (above or
below) and establish the critical dimensions A and B
Note: To measure dimension B on a boat with a sloping rudderstock,
refer to the diagram on page 65.
2. Mark the centers of the two bracket mounting holes.
3. Drill two 6 mm (
1
/
4
in) diameter holes through the center line of
the tiller at the positions you have marked.
4. Attach the tiller bracket using two 6 mm (
1
/
4
in) diameter bolts,
nuts and washers.
5. Bond the fixing bolts in place with two part epoxy adhesive
6. When the epoxy is completely hardened, fully tighten the nuts.
7. Attach the tiller pin to the bracket.
Dimension D
(pushrod below tiller)
Dimension E
(pushrod above tiller)
Bracket
part no.
25 mm (1 in) 51 mm (2 in) D009
51 mm (2 in 76 mm (3 in) D010
76 mm (3 in) 102 mm (4 in) D011
102 mm (4 in) 127 mm (5 in) D159
127 mm (5 in) 152 mm (6 in) D160