


90 ST4000+ Wheel & Tiller Autopilots: Owner’s Handbook
6 Setting-up the ST4000+
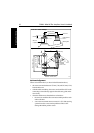
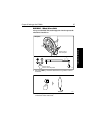
6.2 Check rudder sensor operation (if fitted)
Note: This procedure is only required if you have fitted a rudder
position sensor to a wheel pilot system.
If you have fitted a rudder position sensor to a wheel pilot, before
commencing the initial sea trial you must make sure that it senses
rudder movement in the correct way and is aligned with the rudder:
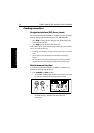
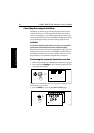
1. Press the
-10 or +10 key to move the helm to check that the rudder
bar display moves in the same direction as the sensor arm:
• if the display moves in the opposite direction, swap the red
and green cables at the control unit (see page 84)
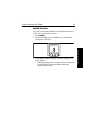
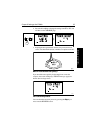
2. When you have done this, use the
-1, +1, -10 and +10 keys to
move the helm to its center position.
3. Check the rudder bar display – the rudder angle should be within
±7° of center.
If necessary, bring the rudder angle to within ±7° of the center by
• loosening the mounting bolts on the rudder position sensor
• rotating the base of the sensor until the reported rudder angle
is as close to zero as possible
• re-tightening the bolts
4. When the offset is less than ±7°, use the rudder alignment
(
ALIGN RUD) setting in Dealer setup (see page 108) to accurately
align the display and helm.
Note: You cannot use the rudder alignment (
ALIGN RUD) setting to
correct an offset of more than ±7°.
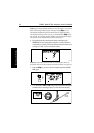
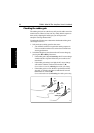
5. Calibrate the rudder limits using the rudder limit (
RUD LIMIT)
setting in Dealer setup:
• manually set the rudder to each end stop (port and starboard):
for each direction, use the rudder bar on the display to
determine the end-stop angle
• access the rudder limit screen (
RUD LIMIT)
• set the autopilot rudder limit so that it is 5° less than the
smallest (port or starboard) mechanical end stop angle