


3.10
ENGINE
A finished cylinder should have a cross-hatch pattern to ensure
piston ring seating and to aid in the retention of the fuel/oil
mixture during initial break in. Hone cylinder according to hone
manufacturer’s instructions, or these guidelines:
• Use a motor speed of approximately 300-500
RPM, run the hone in and out of the cylinder
rapidly until cutting tension decreases. Remember
to keep the hone drive shaft centered (or cylinder
centered on arbor) and to bring the stones
approximately 1/2” (1.3 cm) above and below the
bore at the end of each stroke.
• Release the hone at regular intervals and inspect
the bore to determine if it has been cleared, and to
check piston fit. NOTE: Do not allow cylinder to
heat up during honing. The thinner areas of the
liner around the ports will expand causing uneven
bore.
• After honing has been completed inspect all port
opening areas for rough or sharp edges. Apply a
slight chamfer to all ports to remove sharp edges
or burrs, paying particular attention to the corners
of the intake and exhaust ports.
Cleaning the Cylinder After Honing
It is very important that the cylinder be thoroughly cleaned after
honing to remove all grit material. Wash the cylinder in a
solvent, then in hot, soapy water. Pay close attention to areas
where the cylinder sleeve meets the aluminum casting (transfer
port area). Use electrical contact cleaner if necessary to clean
these areas. Rinse thoroughly, dry with compressed air, and oil
the bore immediately with Polaris 2 Cycle Lubricant.
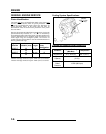
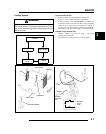
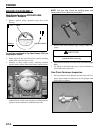
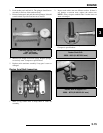
Crankshaft Straightening
Lubricate the bearings and clamp the crankshaft securely in the
Crankshaft Truing Stand (PN 2870569). Refer to the
illustrations below.
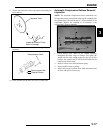
NOTE: The rod pin position in relation to the dial
indicator position tells you what action is required to
straighten the shaft.
1. To correct a situation like the one shown in the illustration,
strike the shaft at point A with a brass hammer.
2. To correct a situation like the one shown in the illustration,
squeeze the crankshaft at points A. (Use tool from
alignment kit).
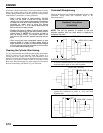
Crankshaft Truing Stand
(PN 2870569)
A
B
HIGH .004 (.1 mm)
HIGH .004 (.1 mm)
SUPPORT CRANKSHAFT
HERE
A
A
HIGH .002 (.05 mm)
HIGH .005 (.13 mm
)
A
A
HIGH .002 (.05 mm)
HIGH .005 (.13 mm)