


Magellan Meridian FAQ – Version 2.0
Page 21 of 30
Step 2 - More data collection
Go to the start of another trail you want to include on your map. Display the map screen and clear the track. Travel
along the trail. Save the track giving it a different file name.
Step 3 - Edit the data you collected to make the map
The 2 track files you created on your memory card are DOS text files. In this step you will combine those two files
into one file to begin making your map. You can keep adding to this file (and thus refining your map) as you travel
on and collect data on more trails.
Pop the memory card out of your GPS and slip it into your card reader. Fire up your favorite ASCII text editing
software. Microsoft's notepad will work fine. (I would tell you that I used WordPerfect Office 2002 as my ASCII
editor to figure all this out but at least half of you would ROFL). Create 1 file that contains both of your track files.
This is the start of the file that contains the map you are building.
Tip #1 The first line in this file must be a valid line from one of your track files.
Tip #2 Any line other than the first line can be a comment line.
Since the Magellan track file complies with the NMEA standards, any line that begins with a single apostrophe is a
comment line. You might want to separate each trail segment you add to this file (your ‘map’ file) first with a blank
line and then with a line giving the name of the following trail segment. The blank line and the trail name line must
begin with a single apostrophe.
Find the first line of the second track you added to this file. Copy that line so it appears twice in this file, one right
after the other. Now edit the first occurrence of that line by (1) changing the time of day so it is at least 4 hours later
than the last line of the previous track in this file and (2) changing the lat/long to anything. (Editor’s note: This is
done to prevent the drawing of a line between the last trackpoint of the previous track and the first trackpoint of the
next track.)
Recalculate the checksum for the line you just changed. The files section of this forum has a utility that will do this.
Download and unzip the file Hex Checksum.zip Run this program and follow the instructions. Edit the line you
changed so the checksum is correct. (Editor’s note: I’ve found that this procedure appears to work fine without
modifying the Checksum).
Save your edits and copy this new file onto your memory card and give it a name. The name must be a DOS 8.3
name. (I'm not sure if lowercase letters are allowed, maybe not.)
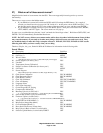
Tip #3: Here is the record layout for the lines in a track file. This info is from the file mag-proto-2-7.zip which is
posted in the files section of this forum.
Example line: $PMGNTRK,4536.571,N,12320.804,W,00491,M,213631.17,A,,021102*65
The first data field in this message is the Latitude, followed by N or S. The next field is the Longitude followed by
E or W. The next field is the altitude followed by "F" for feet or "M" for meters. The next field is the UTC time of
the fix. The next field consists of a status letter of "A" to indicate that the data is valid, or "V" to indicate that the
data is not valid. The last character field is the name of the track, for those units that support named tracks. The last
field contains the UTC date of the fix.
Tip #4: Doing the edits described above will cause the Meridian to NOT draw a line on the GPS screen connecting
the two tracks.
Step 4 - Load the map onto your GPS
Pop the memory card into your GPS and fire it up. Clear current track and use the card utilities to Load Track. Load
the file you created which combined the two tracks you collected.
Your map is now displayed on the screen.
Step 5 - Add to your map
Whenever you want to add to your map, go to where you want to start recording a new trail. Clear track Travel the
trail. Save the track you just created onto the memory card.