24
simply press the up or down arrow key to move to the box that you do
want to change. In this example, we will change the BRG box to altitude
(ALT). To do this, simply press the left or right arrow key while the box is
flashing. The box changes each time the arrow key is pressed. When the
desired box appears, then you can change another box or save your
changes by pressing the ENT key. If you want to leave this screen without
saving the changes, simply press the EXIT key. In this example, we sim-
ply changed the BRG to ALT, then pressed the ENT key. The screen on
the far right on the previous page is the final version. Use this same method
to change the NAV screens.
RESET GROUPS
To restore all windows groups (and boxes on the navigation and plotter
screens) to their factory settings, first press the MENU key, then highlight
the “System Setup” label and press the right arrow key. Now highlight the
“Reset Groups” label on this menu. Press the right arrow key. A message
appears, asking if you really want to do this. Press the right arrow key to
continue, or the left arrow key to exit without resetting the groups.
WAYPOINTS
This GPS receiver gives you the ability to create your own database of
locations, called “waypoints’. You can save your present position, cursor
position, or enter a coordinate and save it as a waypoint. For example,
you may wish to store the location of your parked car as a waypoint be-
fore starting on a hike. When you want to return to the car, all you have to
do is recall the waypoint and the unit will show distance and bearing from
your present position to the car. This unit will store up to 999 waypoints.
Waypoint Menu
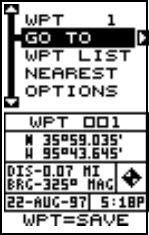
With few exceptions, in order to save, modify, or recall
a waypoint, you will use the waypoint menu, shown at
right. The current waypoint number shows at the top of
the screen. Its name appears near the center of the
screen, right above its position. Beneath this is the dis-
tance and bearing from your present position to the
waypoint. It’s icon shows just to the right of the dis-
tance and bearing. The date and time the waypoint was
saved is at the bottom of this screen. In short, all of the
detail about the waypoint shows on this screen.


