


51
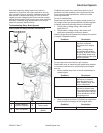
Disassembly/Inspection and Service
20 690 01 Rev. F KohlerEngines.com
Clean all parts thoroughly as engine is disassembled.
Only clean parts can be accurately inspected
and gauged for wear or damage. There are many
commercially available cleaners that will quickly remove
grease, oil, and grime from engine parts. When such a
cleaner is used, follow manufacturer’s instructions and
safety precautions carefully.
Make sure all traces of cleaner are removed before
engine is reassembled and placed into operation. Even
small amounts of these cleaners can quickly break down
lubricating properties of engine oil.
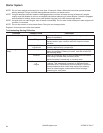
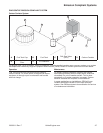
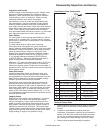
Drain Oil from Crankcase and Remove Oil Filter
1. Remove oil drain plug and oil fi ll cap/dipstick.
2. Allow ample time for oil to drain from crankcase.
3. Remove and discard oil fi lter.
Remove Blower Housing
1. Remove screws securing blower housing to closure
plate.
2. Lift blower housing and separate spark plug lead
from corresponding slot.
Remove Oil Sentry
™
Pressure Switch (if equipped)
NOTE: Pressure switch is installed into center oil galley
of fi lter adapter casting or into closure plate.
1. Disconnect lead from Oil Sentry
™
pressure switch.
2. Remove pressure switch from center oil galley or
adapter elbow of fi lter adapter casting or from
closure plate.
Disconnect Spark Plug Lead
Carefully pull on boot section and disconnect spark plug
lead.
Remove Muffl er
1. Remove nuts or 5/16-18 cap screws attaching
muffl er or exhaust system to engine. Remove any
attached brackets.
2. Remove muffl er and gasket from exhaust port.
Remove Cylinder Head Baffl e
Remove screws attaching cylinder head baffl e to cylinder
head and remove cylinder head baffl e.
Remove Rectifi er-Regulator
1. Unplug connector from rectifi er-regulator.
2. Remove screws securing rectifi er-regulator to
crankcase. Remove rectifi er-regulator.
Remove Electric Starter
1. Disconnect starter lead from terminal stud.
2. Remove nuts securing starter to closure plate.
Remove starter.
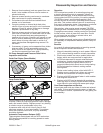
Remove Air Cleaner
1. Disconnect inlet, outlet, and pulse lines from fuel
pump if fuel pump is secured to air cleaner base.
Mark lines for proper reassembly.
2. Loosen knobs and remove air cleaner cover.
3. Remove precleaner (if equipped), and air cleaner
element with formed rubber seal.
4. Remove nut(s) and long mounting screw securing air
cleaner base.
5. Disconnect breather hose from valve cover and
remove air cleaner base and gasket (with fuel pump
attached, if equipped).
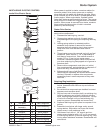
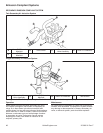
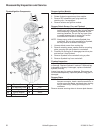
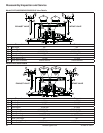
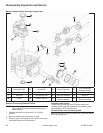
Remove External Governor Components,
Carburetor, and Fuel Pump
WARNING
Explosive Fuel can cause fi res and severe
burns.
Do not fi ll fuel tank while engine is hot or
running.
Gasoline is extremely fl ammable and its vapors can
explode if ignited. Store gasoline only in approved
containers, in well ventilated, unoccupied buildings,
away from sparks or fl ames. Spilled fuel could ignite
if it comes in contact with hot parts or sparks from
ignition. Never use gasoline as a cleaning agent.
NOTE: It is recommended that a new governor lever be
installed whenever removal is performed.
1. Shut off fuel supply. Disconnect fuel line from
carburetor inlet fi tting. If a fuel pump is used,
disconnect pulse line from fi tting on closure plate.
2. Remove heat defl ector mounting screw and special
washer, which also secures ground lead for fuel
shut-off solenoid, if so equipped.
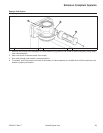
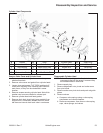
3. If carburetor uses a fuel solenoid, carefully cut
plastic tie strap and disconnect fuel solenoid lead
from wiring harness.
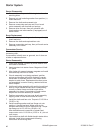
4. Slide carburetor outward and disconnect throttle and
choke linkages.
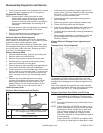
5. Mark mounted position of speed control bracket in
slotted holes and remove screws securing speed
control bracket to closure plate. Note or mark
governor spring hole for correct installation later.
Unhook governor spring, then remove control
bracket (with fuel pump attached, if equipped) and
linkages from engine.
6. Loosen nut and remove governor lever from
governor cross shaft.
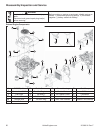
7. Remove carburetor gasket, then carefully remove
heat defl ector and gasket from intake stud. Heat
defl ector is made from a plastic that is quite brittle.
Do not pry on corners, or you risk cracking/breaking
defl ector. If prying is necessary to loosen defl ector,
carefully pry near intake stud only. Remove
mounting stud from cylinder only if required.
8. Remove insert from intake port (some models), if
separate from heat defl ector.