


CM6000 Install Guide
Alarm and Starter System
www.firstechonline.com | www.compustar.com
Copyright 2009 Firstech, LLC.
Page 29
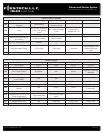
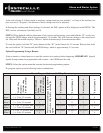
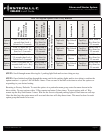
Special Option Groups 1 & 2 CM6000
IMPORTANT: The OP500 is required to change settings in Special Option Groups 1 and 2.
Special Option Group 1
1 Diesel Timer – Option 2-03 must rst be set to setting 2. This special option allows a specic wait to
start time (in seconds) to be programmed. This prevents the need for a timer relay and eliminates a con
nection to the “wait to start” wire.
2 Aux 1 Output Timing – Option 4-01 must rst be set to setting 4. This special option allows a specic
output duration for Aux 1 to be programmed.
3 Aux 2 Output Timing – Option 4-02 must rst be set to setting 4. This special option allows a specic
output duration for Aux 2 to be programmed.
4-8 Aux 3 – 7 Output Timing – Option 3-11 must rst be set to setting 2 and the optional Auxiliary settings
module must be used. These special options allow specic output durations to be set for Aux 3 – 7. Only
available with 2 Way LCD remotes.
Special Option Group 2
This special option group allows you to determine the output type of the POC wire. For example, if you want to
set POC #5 (default setting status out) to Aux 1, you will need change special option 5 to number 10. This must
be done with the OP500.
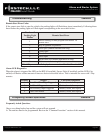
Option Programming CM6000
Option Programming Using the OP500 (programmer)
The OP500 can be used to program any available option. It is required to program options in Special Option
Groups 1 and 2.
STEP 1: Using the blue connector on the top of the OP500, connect it to the control module via the antenna
wire. (Use the included extension cable if necessary.) Once connected, the OP500 will power up as long as the
main ignition harness to the controller has been connected properly.
STEP 2: To change the option number you wish to program, use the left and right arrow keys on the OP500. It
will scroll through the options available in menu 1 and then move to menu 2, then 3 and 4. Use the up and down
arrow buttons on the OP500 to adjust the option settings; “1” is the default setting, and “2”, “3”, and “4” are the
optional settings.