


GB
3
can damage the fuel system or cause performance problems.
If any undesirable operating symptoms occur, use gasoline
with a lower percentage of alcohol or ether.
This engine is certified to operate on gasoline. Exhaust
Emission Control System: EM (Engine Modifications).
Do not use gasoline which contains Methanol. Do not mix oil
with gasoline.
For engine protection, we recommend using Briggs & Stratton
Fuel Stabilizer available from an Authorized Briggs & Stratton
Service Dealer.
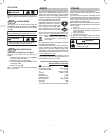
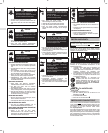
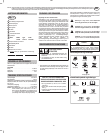
Check fuel level
WARNING
Before refueling, allow
engine to cool 2 minutes.
Clean around fuel fill before removing cap to refuel. Fill tank to
approximately 1/2 inch below lowest portion of fill opening to
allow for fuel expansion. Be careful not to overfill.
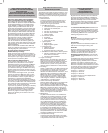
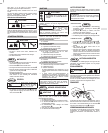
STARTING / STOPPING
WARNING
BEFORE STARTING
• Start, store, and fuel engine in a level position.
• Add fuel and re-install fuel cap.
• Check oil level.
STARTING ENGINE
Fig. 3
• Move throttle Ê to FAST. Operate engine with throttle in
FAST.
• Move choke
Ë control lever to CHOKE.
• Move stop switch to ON (if equipped).
Ì
• When starting engine, pull cord slowly until resistance is
felt, then pull rapidly.
Í
• Allow engine to warm up.
Adjust Choke: Slowly adjust toward RUN position. Wait
until engine runs smoothly before each choke adjustment.
STOPPING
Fig. 4
WARNING
Do not stop engine by moving
choke control to CHOKE.
Backfire, fire or engine dam-
age could occur.
• Move throttle control to IDLE or SLOW position
Ê, if
possible. Then move stop control STOP or OFF position,
if equipped
Ë.
MAINTENANCE
WARNING
To prevent accidental starting, remove spark
plug wire Ê and ground it before servicing.
We recommend that you see an authorized Briggs & Stratton
Dealer for all maintenance and service. Use only Briggs &
Stratton parts.
WARNING
Do not strike the flywheel with
hammer or hard object. If
done, the flywheel may shatter during operation.
Do not tamper with governor spring, links or other parts to
increase engine speed.
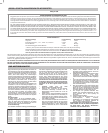
Follow the hourly or calendar intervals, whichever occur
first. More frequent service is required when operating in
adverse conditions noted below.
First 5 Hours
D Change oil
Every 5 hours or daily
D Check oil level
D Clean finger guard on rewind starter
D Clean around muffler
Every 25 hours or every season
D Change oil if operating under heavy load or high
ambient temperature
D Service air cleaner pre-cleaner, if equipped*
D Service air cleaner cartridge, if no pre-cleaner*
Every 50 hours or every season
D Change oil
D Inspect spark arrester, if equipped
Every 100 hours or every season
D Service air cleaner cartridge, if equipped with
pre-cleaner*
D Clean air cooling system*
D Replace spark plug**
* Clean more often under dusty conditions,or when
airborne debris is present or after prolonged operation
cutting tall, dry grass.
** In some areas, local law requires using a resistor spark
plug to suppress ignition signals. If this engine was
originally equipped with resistor spark plug, use same
type of spark plug for replacement.
CAUTION: Used oil is a hazardous waste product.
Dispose of used oil properly. Do not discard with
household waste. Check with your local authorities,
service center, or dealer for safe disposal/recycling
facilities.
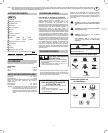
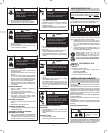
CHANGING ENGINE OIL
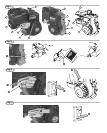
Fig. 5
WARNING
Change oil after first 5 hours of operation. Change oil while
engine is warm. Refill with new oil of recommended SAE
viscosity grade.
1. Place engine level.
2. Disconnect spark plug wire and keep it away from spark
plug.
3. Remove drain plug
Ê and drain oil into appropriate
receptacle.
4. Reinstall oil drain plug. remove oil fill cap.
Ë
5. Add new oil by filling to point of overflowing. Ì
6. Replace oil fill cap.
AIR CLEANER SYSTEMS
All engines have an air cleaner cartridge. The cartridge is
either flat or oval (see illustrations). In addition, some engines
have a pre-cleaner.
CAUTION:
Do not use pressurized air or solvents to clean cartridge.
Pressurized air can damage cartridge; solvents will
dissolve cartridge.
Fig. 6
OVAL AIR CLEANER
1. Push in the tabs
Ê located on the sides of the air
cleaner cover, while pulling cover
Ë off.
2. Remove cartridge
Ì carefully to prevent debris from
entering carburetor.
3. Re-install new air cleaner assembly in base.
Í
4. Reassemble cover by snapping tabs back into place.
Fig. 7
SQUARE AIR CLEANER
1. Loosen screws Ê and remove cover. Ë
2. Remove pre-cleaner Ì (if equipped) and cartridge Í
carefully to prevent debris from entering carburetor.
3. Reinstall clean (or new) air cleaner assembly in
base.
Î
4. To service pre-cleaner (if equipped), separate it from
cartridge, and wash in liquid detergent and water. Air dry
thoroughly. Do not oil. Reinstall dry pre-cleaner on clean
cartridge.
5. Replace cover and tighten screws.
AIR COOLING SYSTEM
Fig. 8
It is recommended to clean the air cooling system with blower
housing removed every 100 hours. Clean areas shown.
Ê
MUFFLER
WARNING
Replacement parts for the muffler must be the same and
installed in the same position as the original parts, otherwise
fire can occur.
If muffler is equipped with spark arrester screen, remove
screen for inspection. Replace screen if damaged or plugged
with debris.
SPARK PLUG
Ê
Ë
Check the spark plug every season. Replace the spark plug if
upon inspection the electrodes are burned or worn. Ensure the
spark plug is clean. Check the gap with a feeler gage
Ê and
reset to .76 mm or .030 in.
Ë if necessary.
COMBUSTION DEPOSITS
We recommend that after every 100-300 hours you have an
Authorized Briggs & Stratton Service Dealer remove combus-
tion deposits from the cylinder, cylinder head, top of piston, and
around valves.