


P. 16 Installation Guide
Manual or Automatic Transmission
This module may be installed on vehicles with manual or automatic transmissions. It is originally
configured for manual transmissions
. If the vehicle you are working on is automatic, it is mandatory
to make a few quick and easy modifications before the unit is connected. In the event that the
configuration requires changes afterwards, a complete reset will be necessary before those
changes become effective.
To install this unit in a vehicle with a manual transmission:
1. Make sure the Yellow loop on the PC board is connected.
2. Connect the Black/White handbrake wire located on the 12-pin harness to the vehicle
handbrake switch.
3. Connect the Violet (+) door input OR
the Green (-) door input wire located on the 12-pin
harness to the vehicle door pin wire, which monitors all the doors of the vehicle (only
use 1 of the 2 door trigger inputs).
4. Make sure the Violet/White TACH wire is plugged in – the TACH wire MUST be hooked
up when the module is set for a manual transmission.
5. Make all your regular connections.
6. Power up the unit by first inserting the 5-pin connector, then the 6-pin connector and
finally the 12-pin connector. The parking lights will flash 4 times to confirm that the unit
is in manual mode.
7. When learning the transmitter, the parking lights will flash 5 times quickly, confirming
that the module is set to manual mode.
8. Upon the first successful remote start, the system will lock the transmission
settings to manual mode.
To install this unit in a vehicle with an automatic transmission:
1. Cut the loop on the pc board (Yellow wire).
2. Make sure the Black/White handbrake wire is not
connected to any of the vehicle
circuits.
3. Make all the regular connections.
4. Power up the unit. The parking lights will flash 4 times.
5. When learning the first transmitter, the parking lights will flash 5 times quickly then give
2 slow flashes, confirming that the module is set to automatic mode.
6. Upon the first successful remote start once the yellow loop has been cut, the
system will lock the transmission settings to automatic mode.
Note: If upon pressing the
START button, the parking lights give 3 slow flashes, make sure that
the Black/White handbrake wire is not connected and that the yellow loop is cut and isolated.
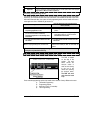
Transmitter Programming Procedure
1. Enter programming mode (see on page 15) the parking lights will stay on for up to 20
seconds.
2. Before the lights go out, turn the ignition key to the OFF position, then to IGNITION ON (RUN) and
immediately back to the OFF position.
3. Press and hold the LOCK button and keep it down until the parking lights flash 5 times quickly.
4. The transmitter has been stored in memory.
Note: Each unit can store 4 remotes in its memory.
To program a transmitter on the second vehicle for multi-car operation, you must press the
TRUNK button (instead of LOCK or UNLOCK) in step 3 of the transmitter programming procedure:
Entering Programming Options
1. Enter programming mode (see on page 15) the parking lights will stay on for up to 20
seconds.