


4
2 – Installation
The installation process has four parts:
• Mounting the transducer
• Mounting the display unit
• Connecting the cables for the transducer and power supply
• Calibrating the display unit
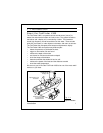
About the Transducer
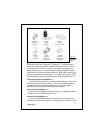
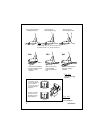
Several different kinds of transducers can be used with this unit. The
transom-mount style, used most often, and in-hull types are shown in
Fig. 2-1.
Besides measuring water depth, the transducers also have two other
sensors: a paddle wheel which detects the speed of the boat, and a
sensor for the water temperature. The display unit uses the speed
information to calculate the distance the boat has traveled. An optional
transducer, the Sidelooker, detects objects by looking out to the sides of
the boat.
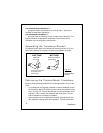
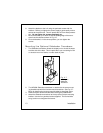
Since the transducer is very important to the operation of the FishFinder,
it is vital that the transducer be mounted correctly. The transducer will
give the most reliable readings if it looks into water which is smooth and
undisturbed. If you place the transducer so bubbles or turbulence flow
across the face of the unit, the system may give inaccurate readings.
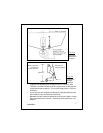
There are three important rules when mounting any type of transducer:
• The transducer should be continuously covered by water when the
boat is moving. (If the transducer is mounted near the side of the
boat, it may be exposed when the boat is turning.)
• The transducer should be placed where turbulence or bubbles will not
pass directly over the face of the unit. Don’t place the transducer
behind any running strakes, intakes, or thru-hull fittings which create
turbulence.
• The transducer should be mounted where it will not be affected by the
wash from the propeller(s).
Installation