


12
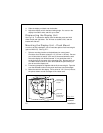
fairing block must be able to resist the drag of the water against the
hull, and must also be completely waterproof.
6. If the hull of the boat has a core-type hull, you will need to follow
some special mounting procedures. The core material must be
protected from any water which may leak from the inside of the boat.
(If the core material is allowed to remain wet, it may rot and weaken
the hull.)
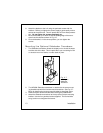
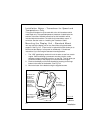
7. When working with the transducer, support it by holding the body of
the unit or the rings. Do not hang the transducer from the cable.
8. It is very important to seal the opening around the transducer using a
high-quality marine sealant suitable for underwater use. After
installation, do not leave your boat in the water for any amount of time
without checking for leaks.
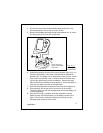
Installation Notes – In-Hull Transducer
Detailed instructions for this installation will be included with the trans-
ducer. In this section, we will note just a few important points.
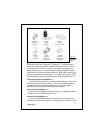
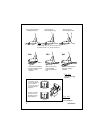
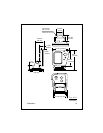
1. Choose the best mounting location:
For outboard powerboats – Install as far aft as possible
For inboard/outboard powerboats – Install close to the engine(s)
For inboard powerboats – Install forward of the propeller(s) and
shaft(s)
For sailboats – Install near the centerline of the hull and forward of
the leading edge of the keel
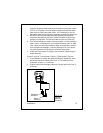
2. An in-hull transducer may only be installed in a fiberglass hull which is
no more than 1" (25 mm) thick. The in-hull transducer may not be
installed in wood or aluminum hulls.
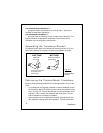
3. Use the standard in-hull transducer if it will be installed in a flat part of
the hull, or a section with no more than 10° of deadrise. Use the
angled in-hull transducer if the mounting location has up to a 22° of
deadrise.
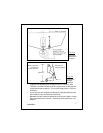
4. Do not try to compensate for the angle of the hull by fairing the epoxy
adhesive on the face of the transducer.
5. Use the epoxy supplied with the in-hull transducer, or an equivalent
epoxy glue. Do not use any other type of adhesive, including silicone
or RTV adhesive.
Installation