


Black plate (229,1)
Model "R35-D" EDITED: 2009/ 3/ 11
NOTE:
. You can check the pressure of all four
tires on the multi function display. See
the separate Multi Function Display
Owner’s Manual.
. The tires of this vehicle are filled with
nitrogen gas. When the tire pressure is
low, fill the tires with nitrogen. Contact
a GT-R certified NISSAN dealer for
information on filling the tires with
nitrogen.
. If nitrogen is not available, compressed
air may be safely used under normal
driving conditions. However, NISSAN
recommends refilling with nitrogen for
maximum tire performance.
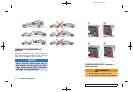
RUN-FLAT TIRES
Run-flat tires are those tires that can be used
temporarily if they are punctured. (
“Run-flat
tires” page 8-34)
Also, see the tire safety information in the
Warranty Information Booklet.
WARNING
. Although you can continue driving
with a punctured run-flat tire, re-
member that vehicle handling sta-
bility is reduced, which could lead to
an accident and personal injury.
Also, driving a long distance at high
speeds may damage the tires.
. Do not drive at speeds above 50
MPH (80 km/h) and do not drive
more than 50 miles (80 km) with a
punctured run-flat tire. The actual
distance the vehicle can be driven
on a flat tire depends on outside
temperature, vehicle load, road con-
ditions and other factors.
. Drive safely at reduced speeds.
Avoid hard corne ring or braking,
which may cause you to lose control
of the vehicle.
NOTICE
. Never install tire chains on a punc-
tured run-flat tire, as this cou ld
damage your vehicle.
. Avoid driving over any projection or
pothole, as the clearance between
the vehicle and the ground is smal-
ler than normal.
. Do not enter an automated car wash
with a punctured run-flat tire.
. Have the punctured tire replaced by
your GT-R certified NISSAN dealer
as soon as possible, as the tire’s
performance capability is reduced.
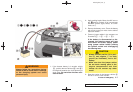
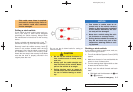
If you have a flat tire and have to stop the
vehicle, follow the instructions below.
1. Safely move the vehicle off the road and
away from traffic.
2. Turn on the hazard warning flashers.
3. Park on a level surface and apply the parking
brake. Move the shift lever to the
&
P
position.
4. Turn off the engine.
5. Raise the hood to warn other traffic, and to
signal professional road assistance person-
nel that you need assistance.
6. Have all passengers get out of the vehicle
and stand in a safe place, away from traffic
and clear of the vehicle.
If needed Roadside Assistance is available.
Please see your Warranty Information Booklet
for the toll-free number to call (U.S.) or Warranty
Information Booklet (Canada).
For the tire removing procedure, see the
following section. (
“JACKING VEHICLE
AND REMOVING WHEELS” page 8-38)
In case of emergency 6-3