4. Press the
R
key once to move the character highlight
to the next character space.
5. Repeat steps 3 and 4 until the word ‘DOCK’ is shown.
6. Press
F
to complete entry of the name.
7. Press the
D
key twice to return the field highlight
to the ‘SAVE?’ field.
8. Press the
F
key to confirm that you want to save
the position as a waypoint named ‘DOCK’.
The mark position page will now be replaced by
the Position Page (or whatever page was displayed
prior to pressing the
M
key). The ‘DOCK’ waypoint
is now stored in the GPS 125 Sounder’s memory, and
will remain there until you manually remove it or clear
the receiver’s memory. For more on waypoint manage-
ment, see pg. 21-28.
Using the Position and Map Pages
Now that you’ve marked a position, let’s see how
the Position and Map Pages can be used to monitor
your progress as we head out into the open water.
As always, ensure your primary focus is on
boating traffic and monitor the GPS 125
Sounder briefly when operating your boat.
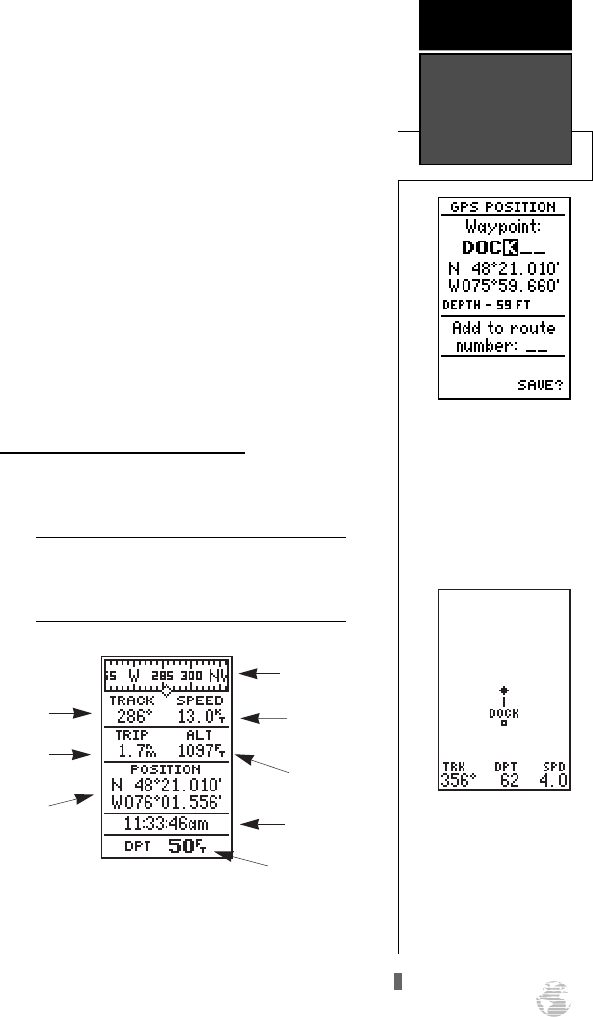
The direction you are moving (track) and your
speed are shown on the top of the Position Page, below
the graphic compass tape. The latitude, longitude, and
approximate altitude of your position--with a resettable
trip odometer--are displayed in the middle of the page,
with the time of day and digital depth shown below.
11
The arrow keypad is used
for all data entry. Use the
UP and DOWN keys to
select letters, numbers, or
menu options, and use the
LEFT and RIGHT keys to
move the cursor forward or
backward along the line.
GETTING
STARTED
Marking
Waypoint &
Map Page
The Map Page displays
your present position as a
diamond icon and provides
a real-time graphic “bread-
crumb” display of your
track right on the screen.
Altitude
Current Speed
Track Over
Ground
Graphic
Compass Tape
Tr i p
Odometer
Position
Display
12/24 Hour
Time
Digital Depth
!
125 Man Rev B 7/23/98 11:47 AM Page 11


