


6-3
Note: HU is not available on the RADAR/VIDEO PLOTTER display.
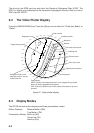
When own ship mark is at a distance from the screen center 3/4 the range in use it is
automatically reset to a point of 50% radius.
6.3.1 Precaution for chart/memory cards
Both the chart card and memory card are susceptible to sunlight and magnetic material.
• Keep them away from direct sunlight, heat sources and active gases.
• Keep cards away from water and chemicals.
• Keep the connector free of foreign material.
• Do not drop the cards.
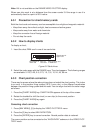
6.3.2 How to display charts
To display a chart;
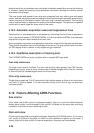
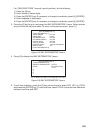
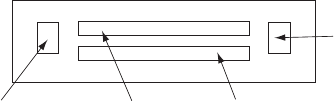
1. Insert the chart RAM card in one of two card slots.
Eject button for
lower card
Eject button for
upper card
Drive for
chart card
Drive for chart card
or RAM card
Figure 6-2 Card drives
2. Select the radar range with the RANGE keys. The chart appears. The following ranges
are available: 0.125, 0.25, 0.5, 0.75, 1.5, 3, 6, 12, 24, 48, 96 nm.
6.3.3 Chart position correction
There may be a case where the radar picture does not match the chart overlay. This is due
to an error in the position fixing system (GPS, Loran, etc.) or the different coordinates
between the position fixing system and the radar. You can align chart with the radar image
as follows:
1. Press the [CHART ALIGN] key. CHART ALIGN appears at the top of the screen.
2. Rotate the trackball to shift the chart (or own ship) to the correct position.
3. Press the [CHART ALIGN] key again.
Canceling chart correction
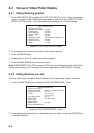
1. Press [NAV MENU], [0] to display the VIDEO PLOTTER 2 menu.
2. Press the [2] key to select NAV DATA POSN.
3. Press the [ENTER] key to cancel correction. Navaid position data is restored.
The cursor position can be corrected on the “ALIGN DATA” submenu in the VIDEO PLOT-
TER 2 menu.