


PAGE
1G-287 4/96
26-SI ALTERNATOR
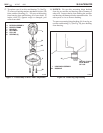
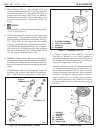
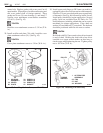
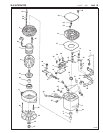
center hole. Replace gasket with a new one if at all
questionable. Wipe edges of rectifier end housing and
end cover gasket clean of foreign material. Place
gasket and cover (19) onto housing (1) and install 7
rectifier cover attachment screw/washer assemblies
(32 & 33). (See Fig. 45)
TIGHTEN
Rectifier cover attachment screws to 5.3 N.m (47 lb.
in.).
29. Install rectifier end plate (20) with 4 rectifier cover
plate attachment screws (34). (See Fig. 45)
TIGHTEN
Cover plate attachment screws to 3 N.m (26 lb. in.).
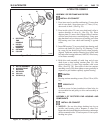
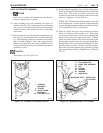
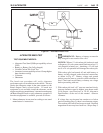
30. Install spacer and slinger to DE frame on models so
equipped (refer to Service Parts section of this manual).
Place fan (23) onto rotor shaft with vanes toward body
of alternator, (See Fig. 46) followed by baffle, if used.
Install pulley suitable for engine application. Several
pulley styles are available from AC-Delco for 7/8"
shaft alternators, including a blank that can be custom
machined for unique applications. Place shaft nut
washer (42) and shaft nut (27) onto shaft. The shaft nut
should be positioned with flat side next to washer.
TIGHTEN
Hold shaft with 5/16" hex wrench or hex driver inserted
in end of shaft. Holding the shaft with a hex driver
installed on a torque wrench makes an ideal way to
check torque while tightening the nut. Tighten pulley
nut to 102 N.m (75 lb. ft.).
22
Figure 46. Installing Fan and PulleyFigure 45. Installing Gasket, Cover, and End Plate
1. HOUSING
ASSEMBLY
19. COVER
20. PLATE
32. SCREW (3)
33. SCREW (4)
34. SCREW (4)
47. GASKET
20
33
32
47
1
19
32
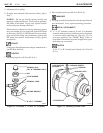
1. ALTERNATOR
ASSEMBLY
23. FAN
27. NUT
42. WASHER
1
TORQUE
WRENCH
PULLEY
23
42
27
WRENCH
26-5018
26-5030