


C2924M (4/05) 37
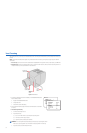
6. Varifocal lens only:
a. Set the varifocal to wide (W) and the lens focal length to far (∞).
b. Adjust the back focus:
(1) Use the enclosed 1.5-mm Allen wrench to loosen the back focus locking screw.
(2) Turn the lens until the image is focused.
(3) Tighten the back focus locking screw clockwise.
Back focus is a coarse adjustment. You will make the fine focus adjustment in steps c and d.
c. Move the varifocal locking screw up or down to set the field of view.
d. Adjust the lens focus to achieve the best fine focus.
e. Repeat steps c and d until the focus is correct.
7. Manual iris only: Adjust the iris for the best picture quality. The largest aperture gives the best light sensitivity; the smallest aperture
gives the greatest depth of field.
8. Tighten all lens locking screws.
NOTE: When tightening the lens locking screws, do not over-turn or force any screw.
9. Auto iris only: Remove the ND filter.
10. If necessary, disable AGC.
a. Display the EXPOSURE SETTINGS menu.
b. Change AGC to OFF.
c. Select EXIT to save the AGC setting.
11. Auto iris only: Perform the auto iris lens adjustment procedure (refer to Auto Iris Lens
Adjustment).
12. As soon as you finish customizing this and all other camera settings, save your custom
settings into the CUSTOM profile. This protects them in case the camera loses power
or must be restarted (refer to Profiles for more information).
WARNING: Do not over-tighten the back focus locking screw because you may damage the camera.
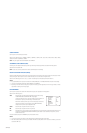
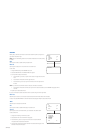
MAIN MENU
PROFILES >
EXPOSURE SETTINGS >
FUNCTION SETTINGS >
CAMERA SETUP >
AI AUTO ADJUSTMENT >
PIXEL CORRECTION >
SYSTEM INFORMATION >
EXIT
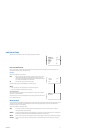
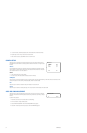
EXPOSURE SETTINGS
AUTO EXPOSURE > NORMAL
VIDEO LEVEL > 0
FLICKERLESS > OFF
AGC > OFF
DSS(SENS) > 4
DAY & NIGHT > COLOR
D&N DETECTION >
D&N FILTER LIMIT >
BACK EXIT