


Useful features
191
exhaust gas is hazardous to your health. All
exhaust gas contains carbon monoxide
(CO), and inhaling it can cause uncon-
sciousness and possible death.
Programming the integrated remote
control
X
Step 1: Switch on the ignition.
X
Step 2: If you have previously programmed
a signal transmitter button and wish to
retain its programming, proceed to step 3.
or
X
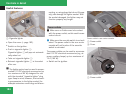
If you are programming the integrated
remote control for the first time, press and
hold the two outer signal transmitter but-
tons 2 and 4 and release them only when
indicator lamp 1 begins to flash after
approximately 20 seconds (do not hold the
button for longer than 30 seconds).
This procedure erases any previous set-
tings for all three channels and initializes
the memory. If you later wish to program a
second and/or third hand-held transmitter
to the remaining two signal transmitter but-
tons, do not repeat this step and begin
directly with step 3.
X
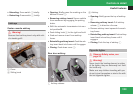
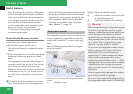
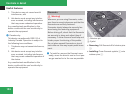
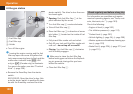
Step 3: Hold the end of hand-held remote
control 5 of the device you wish to train
approximately 2 to 12 in (5 to 30 cm) away
from the signal transmitter button (2, 3
or 4) to be programmed, while keeping
indicator lamp 1 in view.
X
Step 4: Using both hands, simultaneously
press hand-held remote control button 6
and the desired signal transmitter button
(2, 3 or 4). Do not release the buttons
until step 5 is completed.
Indicator lamp 1 will flash, first slowly and
then rapidly.
i
Indicator lamp 1 flashes immediately
the first time the signal transmitter button
is programmed. If this button has already
been programmed, the indicator lamp will
only start flashing after 20 seconds.
X
Step 5: After indicator lamp 1 changes
from a slow to a rapidly flashing light,
release the hand-held remote control but-
ton and the signal transmitter button.
X
Step 6: Press and hold the just-trained sig-
nal transmitter button (2, 3 or 4) and
observe indicator lamp 1.
If indicator lamp 1 stays on constantly,
programming is complete and your device
should activate when the respective signal
transmitter button (2, 3 or 4) is pressed
and released.
i
If indicator lamp 1 flashes rapidly for
approximately 2 seconds and then turns to
a constant light, continue with program-
ming steps 8 through 12 as your garage
door opener may be equipped with the
“rolling code” feature.
X
Step 7: To program the remaining two sig-
nal transmitter buttons, repeat the steps
above starting with step 3.
Rolling code programming
To train a garage door opener (or other rolling
code devices) with the rolling code feature,
follow these instructions after completing the
“Programming” portion (steps 1 through 6) of
this text. (A second person may make the fol-
lowing training procedures quicker and eas-
ier.)
X
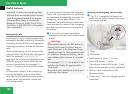
Step 8: Locate the “training” button on the
garage door opener motor head unit.
i
Exact location and color of the button may
vary by garage door opener brand. Depend-
ing on manufacturer, the “training” button
may also be referred to as “learn”or
Controls in detail
Z