74
Reassembly
KohlerEngines.com 20 690 01 Rev. F
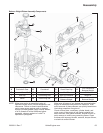
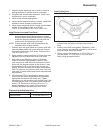
Install Fuel Pump (if equipped)
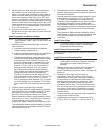
NOTE: If fuel pump is attached to air cleaner base, fuel
lines and pulse line should still be connected to
fuel pump. Connect pulse line to pulse fi tting and
secure with clamp.
1. Attach fuel pump mounting bracket to speed control
bracket with two M5 screws. Torque screws to
6.5 N·m (55 in. lb.) into new holes, or 4.0 N·m
(35 in. lb.) into used holes.
2. Attach fuel pump to bracket so pulse fi tting is
oriented in four o’clock position. Secure with two M6
screws. Torque screws to 9.5 N·m (84 in. lb.) into
new holes, or 5.9 N·m (52 in. lb.) into used holes. Do
not over tighten.
3. Connect pulse and fuel lines to fuel pump and
secure with clamps.
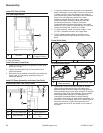
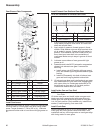
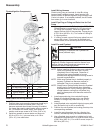
Install Rectifi er-Regulator
1. Using M6 screws, mount rectifi er-regulator onto
crankcase bosses, with cooling fi ns out. Torque
screws to 6.0 N·m (55 in. lb.) into new holes, or
4.0 N·m (35 in. lb.) into used holes.
2. Attach connector to rectifi er-regulator terminals.
Install Cylinder Head Baffl e
Attach cylinder head baffl e to cylinder head using
screws. Torque screws to 10.2-12.4 N·m (90-110 in. lb.)
into new holes, or 7.0-8.5 N·m (62-75 in. lb.) into used
holes.
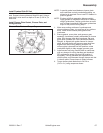
Install Oil Sentry
™
or Pipe Plug
Apply pipe sealant with Tefl on
®
(Loctite
®
PST
®
592™
Thread Sealant or equivalent), to threads of 1/8” pipe
plug or adapter. Install and tighten into port on closure
plate. Torque pipe plug to 4.5-5.0 N·m (40-45 in. lb.). If
a switch was installed, apply sealant to threads of Oil
Sentry
™
switch and install into adapter, center passage
or closure plate behind blower housing. Torque switch
to 4.5-5.0 N·m (40-45 in. lb.). Connect green wiring
harness lead to terminal on switch.
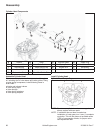
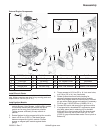
Install Blower Housing and Debris Screen
1. Position blower housing on engine and route spark
plug lead through underside slot.
2. Check stator leads are within notch of blower
housing. Align mounting locations, then install four
M6 shouldered mounting screws. If a fl at washer
was used under head on one screw, install screw in
location closest to oil fi ll/dipstick. Torque screws to
11.6 N·m (99 in. lb.) into new holes, or 7.7 N·m
(68 in. lb.) into used holes.
3. Snap debris screen onto cooling fan.
Install Air Cleaner Element, Precleaner, and Air
Cleaner Cover
1. Install air cleaner element with pleated side out. Seat
rubber seal onto all edges of air cleaner base.
2. Install precleaner (if equipped), into upper section of
air cleaner cover.
3. Install air cleaner cover and secure with two
retaining knobs.
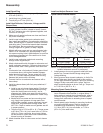
Install Muffl er
1. Install gasket, muffl er, and nuts on exhaust port
studs. Leave nuts slightly loose.
2. If an auxiliary muffl er bracket is used, install M6
screw(s) into bracket.
3. Torque nuts to 24.4 N·m (216 in. lb.). Torque screws
to 7.5 N·m (65 in. lb.).
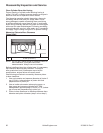
Install Drain Plug, Oil Filter, and Oil
1. Install oil drain plug. Torque plug to 14 N·m
(125 in. lb.).
2. Place new fi lter in shallow pan with open end up. Fill
with new oil until oil reaches bottom of threads. Allow
2 minutes for oil to be absorbed by fi lter material.
3. Apply a thin fi lm of clean oil to rubber gasket on new
fi lter.
4. Refer to instructions on oil fi lter for proper
installation.
5. Fill crankcase with new oil. Level should be at top of
indicator on dipstick.
6. Reinstall oil fi ll cap/dipstick and tighten securely.
Prepare Engine for Operation
Engine is now completely reassembled. Before starting
or operating engine, be sure following have been done.
1. All hardware is tightened securely.
2. Oil drain plug, Oil Sentry
™
pressure switch (if
equipped), and a new oil fi lter are installed.
3. Crankcase is fi lled with correct amount, weight, and
type of oil.
Testing Engine
It is recommended engine be operated on a test stand or
bench prior to installation in piece of equipment.
1. Set engine up on a test stand. Install an oil pressure
gauge. Start engine and check to be certain oil
pressure (5 psi or more) is present.
2. Run engine for 5-10 minutes between idle and
mid-range. Adjust throttle and choke controls and
high-speed setting as necessary. Make sure
maximum engine speed does not exceed 3300
RPM. Adjust carburetor idle fuel needle and/or idle
speed screw as necessary. Refer to Fuel System
and Governor System.


