


190-00067-25 Rev D 4-5
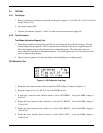
4.3.10 Remote Battery Pack and Charger Disassembly (Figure 7-5)
1. Remove four screws (1) holding Cover to Base. Remove Cover.
2. To replace Battery Pack, disconnect the three-pin Connector J102 from Charger Circuit
Board.
3. Remove Battery Pack (2) from unit.
4. To remove Charger Circuit Board Assembly (3), remove four Screws (4) holding Board to
Base.
5. Remove two hex standoffs (5) holding J101 Connector to Chassis. Carefully lift charger board
from Chassis.
4.4 REASSEMBLY
1. Attach the Power Switch to the Chassis by reversing the steps followed in paragraph 4.3.7. The
Switch is correctly installed when the contacts and flexible circuit cable are pointed away from the
Chassis frame.
2. Ensure that the Power/Volume Switch is in the ‘OFF’ position.
3. Attach the GPS Receiver to the Main Chassis Assembly by reversing the steps followed in paragraph
3.3.6.
4. Mount the CPU Board Subassembly on the Chassis by reversing the steps followed in paragraph
4.3.5. Be sure to pull up on the retaining lip of the ZIF Connector (J804) before inserting the flexible
circuit cable.
5. Mount the Interface Board to the Chassis by reversing the steps followed in paragraph 4.3.4.
6. Install the Altitude Decoder Assembly by reversing the steps followed in paragraph 4.3.3. Carefully
observe proper orientation and alignment when reconnecting the ribbon cable to the board.
7. Mount the Display Module to the CDU bezel by reversing the steps followed in paragraph 4.3.9. Be
sure to reinstall the four rubber grommets before mounting the board.
8. Mount the Rotary Switch Assembly to the CDU by reversing the steps followed in paragraph 4.3.8.
The Switch is correctly installed when the flex circuit soldered connection points toward the top of
the unit. Torque hex nut to 25 ± 3 in oz.
9. Install the CDU by reversing the steps followed in paragraph 4.3.2. Gently slide the CDU onto the
two CPU Board Connectors, observing proper pin alignment during the process.
10. Install the top and Bottom Covers by reversing the steps followed in paragraph 4.3.1.