


NOTE: In order for the software update instructions to
appear, the device must be fully booted before the card is
inserted.
3
Follow the on-screen instructions.
4
Wait several minutes while the software update process
completes.
The device returns to normal operation after the software
update process is complete.
5
Remove the memory card.
NOTE: If the memory card is removed before the device
restarts fully, the software update is not complete.
GPS Satellite Signals
When you turn on the chartplotter, the GPS receiver must
collect satellite data and establish the current location. When
the chartplotter acquires satellite signals, appears at the top
of the Home screen. When the chartplotter loses satellite
signals, disappears and a flashing question mark appears
over on the chart.
For more information about GPS, go to www.garmin.com
/aboutGPS.
Selecting the GPS Source
You can select your preferred source for GPS data, if you have
more than one GPS source.
1
Select Settings > System > GPS > Source.
2
Select the source for GPS data.
Setting the Vessel Type
You can select your boat type to configure the chartplotter
settings and to use features customized for your boat type.
1
Select Settings > My Vessel > Vessel Type.
2
Select Powerboat or Sailboat.
Adjusting the Backlight
1
Select Settings > System > Display > Backlight.
TIP: Press from any screen to open the backlight settings.
2
Select an option:
• Adjust the backlight level.
• Select Auto Backlight.
Adjusting the Color Mode
1
Select Settings > System > Display > Color Mode.
TIP: Press from any screen to access the color settings.
2
Select an option.
Customizing the Home Screen
You can add items to and rearrange items on the Home screen.
1
From the Home screen, select Customize Home.
2
Select an option:
• To rearrange an item, select Rearrange, select the item
to move, and select the new location.
• To add an item to the Home screen, select Add, and
select the new item.
• To remove an item you have added to the Home screen,
select Remove, and select the item.
Using the Garmin Helm™ App with the
Chartplotter
Before you can control the chartplotter with the Garmin Helm
app, you must download and install the application, and connect
the chartplotter to a mobile device (Connecting a Wireless
Device to the Chartplotter).
1
Select Settings > Communications > Wireless Devices >
Helm App.
2
Select an option.
3
Use the application to view or control the chartplotter.
Communication with Wireless Devices
The chartplotters can create a wireless network to which you
can connect wireless devices. Also, some models can connect
to Bluetooth
®
wireless devices using the AVRCP profile.
Setting Up the Wi‑Fi
®
Wireless Network
The chartplotters can create a Wi‑Fi network to which you can
connect wireless devices. The first time you access the wireless
network settings, you are prompted to set up the network.
1
Select Settings > Communications > Wireless Devices >
Wi-Fi® Network > Wi-Fi® > On > OK.
2
If necessary, enter a name for this wireless network.
3
Enter a password.
You will need this password to access the wireless network
from a wireless device. The password is case-sensitive.
Connecting a Wireless Device to the Chartplotter
Before you can connect a wireless device to the chartplotter
wireless network, you must configure the chartplotter wireless
network (Setting Up the Wi‑Fi
®
Wireless Network).
You can connect multiple wireless devices to the chartplotter to
share data.
1
From the wireless device, turn on the Wi‑Fi technology and
search for wireless networks.
2
Select the name of your chartplotter wireless network
(Setting Up the Wi‑Fi
®
Wireless Network).
3
Enter the network password.
Changing the Wireless Channel
You can change the wireless channel if you have trouble finding
or connecting to a device, or if you experience interference.
1
Select Settings > Communications > Wireless Devices >
Advanced > Wi-Fi® Channel.
2
Enter a new channel.
You do not need to change the wireless channel in any devices
connected to this network.
Charts and 3D Chart Views
The charts and 3D chart views that are available depend on the
map data and accessories used.
You can access the charts and 3D chart views by selecting
Charts.
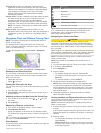
Navigation Chart: Shows navigation data available on your
pre-loaded maps and from supplemental maps, if available.
The data includes buoys, lights, cables, depth soundings,
marinas, and tide stations in an overhead view.
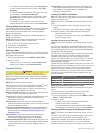
Perspective 3D: Provides a view from above and behind the
boat (according to your course) and provides a visual
navigation aid. This view is helpful when navigating tricky
shoals, reefs, bridges, or channels, and is beneficial when
trying to identify entry and exit routes in unfamiliar harbors or
anchorages.
Mariner’s Eye 3D: Shows a detailed, three-dimensional view
from above and behind the boat (according to your course)
and provides a visual navigation aid. This view is helpful
when navigating tricky shoals, reefs, bridges, or channels,
and when trying to identify entry and exit routes in unfamiliar
harbors or anchorages.
NOTE: Mariner's Eye 3D and Fish Eye 3D chart views are
available with premium charts, in some areas.
2 Charts and 3D Chart Views