


15
3. Select “6. IntReject”.
4. Select level desired by operating the
omnipad.
5. Press the [ACQ/ENTER] key.
6. Press the [MENU] key to close the menu.
IR and level selected appears at the bottom
right corner on the display when the interfer-
ence rejection circuit is turned on.
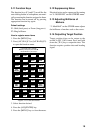
3.6 Selecting Pulsewidth
Pulsewidth is the transmission time of a single
radar pulse. The longer the pulsewidth the
greater the direction range capability, however
range accuracy and range resolution are re-
duced.
Pulsewidth can be selected to short or long
on the 1.5 and 3 nautical mile ranges.
1. Press the [MENU] key.
2. Select “OTHER MENU” and press the
[ACQ/ENTER] key.
3. Select “7. Pulselength”.
4. Select Short or Long by pressing the
omnipad.
5. Press the [ACQ/ENTER] key to select.
6. Press the [MENU] key to close the menu.
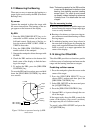
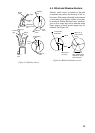
3.7 Guard Alarm
The guard alarm allows the operator to set the
desired range and bearing for a guard zone.
When ships, islands, landmasses, etc. violate
the guard zone an audible alarm sounds and
the offending target brinks to call the
operator’s attention.
Selection of guard zone type
The guard alarm can be set to sound when a
target either enters or exits the guard zone.
You can select which type of guard alarm you
want through the menu.
In alarm
The alarm sounds on targets entering the guard
zone. “G (IN)” appears at the top right-hand
corner when the In alarm is selected.
Out alarm
The alarm sounds on targets exiting the guard
zone. “G (OUT)” appears at the top right-hand
corner when the Out alarm is selected.
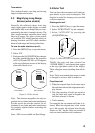
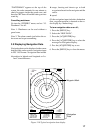
IN ALARM
OUT ALARM
Guard
zone
Dashed line:
no alarm
Figure 3-7 In and Out alarm
Setting a guard zone
Preparation
1. Press the [MENU] key, and then select
“OTHER MENU” and pressing the [ACQ/
ENTER] key.
2. Select “17. Guard Mode” and “In” (alarm
on target entering zone) or “Out” (alarm
on target exiting zone) by operating the
omnipad.
3. Press the [ACQ/ENTER] key.
4. Press the [MENU] key to close the menu.
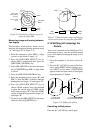
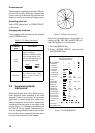
To set a guard zone
1. Mentally create the guard zone you want
to set.
2. Operate the omnipad to set the cursor on
point A or B. Press the [GUARD] key. “*G
(IN)” or “*G (OUT)”, with asterisk blink-
ing, appears at the top right-hand corner of
the display. See Figure 3-8 (2). (The aster-
isk indicates the guard zone is partially set.)
3. Operate the omnipad to set the cursor on
point C or D. See Figure 3-8 (3).
4. Press the [GUARD] key. The asterisk dis-
appears. See Figure 3-8 (4).