


Installation & Programming Manual FX & VFX Series Inverter/Charger System Copyright 2003 OutBack Power Systems, Inc.
900-0027-1 19009 62
nd
Ave NE, Arlington WA 98223 USA
Page 28 Rev 7.2 08/26/05 Tel 360 435 6030 Fax 360 435 6019
STACKING INSTRUCTIONS
Stacking Procedure (Continued)
The next two screens in the “Stack” menu on the MATE are the “POWER SAVE LEVEL MASTER ADJUST ONLY” and “POWER SAVE
LEVEL SLAVE ADJUST ONLY” screen. You can access these screens by pressing DOWN once or twice if you are currently on the
STACK PHASE screen. Since nobody (seriously, even here at OutBack) understands these screens the first 3-4 times they are
explained, we offer our best effort right here. These screens only make complete sense after you’ve read and understand both of them.
These two screens only pertain to systems that have “OB Slave L1” and “OB Slave L2” type slaves.
POWER SAVE LEVEL MASTER ADJUST ONLY
Only adjust the value on this screen if you wish to have one or more of the Slave FX’s AC outputs “On” at all times. This may be
necessary if you wish to have instantaneous power on Leg 2 or are having trouble starting large loads. The first thing to note is that this
screen pertains to the Master FX only and therefore you must be on port 1 (P01 in the upper right-hand corner of the MATE). Press
PORT on the MATE until you see P01 on the MATE. The number to the right of the screen is the “Slave Rank Designator”. The default
value for the Slave Rank Designator is zero (0) on every FX. By pressing INC on the MATE you can increment (by whole numbers) this
value. If this value is set to a number greater than zero then the Master FX will keep the Slave FX’s AC outputs “On” if they have a
“POWER SAVE LEVEL SLAVE ADJUST ONLY” value equal to or less than this number (for instance, if this value is set to “2” then all
the Slaves with “POWER SAVE LEVEL SLAVE ADJUST ONLY” values of “1” or “2” will have their AC outputs kept “On”). Any Slave
with a “POWER SAVE LEVEL SLAVE ADJUST ONLY” value greater than the Masters “POWER SAVE LEVEL MASTER ADJUST
ONLY” value will be “asleep” (AC output is “Off”) until the Master calls upon it to help with large loads.
POWER SAVE LEVEL SLAVE ADJUST ONLY
This screen allows you to assign the “Slave Rank” of the Slave FX’s in the system. The first thing to note is that this screen pertains to
the Slave FX’s only and therefore you must be on port 2 or greater on the MATE (shown in the upper right-hand corner of the MATE as
P02 or P03, etc.). Press PORT on the MATE until you see the port that you wish to program displayed on the MATE. The number to
the right of the screen is the “Slave Rank”. All Slave FX’s have “POWER SAVE LEVEL SLAVE ADJUST ONLY” (or “Slave Rank”)
default values of 1. If this value is not changed from 1 then one of two things will happen. First, if the Master FX has been
programmed with a value of 1 or greater in the “POWER SAVE LEVEL MASTER ADJUST ONLY” screen then all of the Slave FX’s
(with “Slave Rank” = 1) will remain “On” at all times. Second, if the Master FX has been programmed with a value of zero in the
“POWER SAVE LEVEL MASTER ADJUST ONLY” screen then all of the Slave FX’s will remain “Off” until the Master FX needs help
and calls for the Slave FX’s with “Slave Rank” equal to 1 to come “On”. This will turn on all of the Slaves. If your system includes more
than one Slave FX then will want to choose a different “Slave Rank” for each Slave FX. This allows them to come “On” one at a time
which saves power in the long run. To change the “Slave Rank” of a given Slave FX, press the PORT button on the MATE until the
Slave FX’s port appears in the upper right-hand corner of the MATE. Next, press INC to increase the value until it is what you desire.
Repeat this process for each Slave in the system. When a Slave FX has a “POWER SAVE LEVEL SLAVE ADJUST ONLY” value
greater than the Master FX’s “POWER SAVE LEVEL MASTER ADJUST ONLY” it will remain “Asleep” (and save about 18 watts).
When large loads are present, the Master FX will call out for “Slave Rank” = 1 to come “On” (unless it is already “On” due to the
“POWER SAVE LEVEL MASTER ADJUST ONLY” setting being 1 or greater). If the Master FX needs even more power then it will call
out for “Slave Rank” = 2 to come “On” and so on.
Using these three screens will allow you to stack your system in many different configurations. As an addition to the explanations
above, we have offered some examples of common systems outlined below.
System Examples
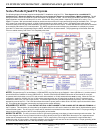
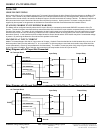
DUAL-STACKED SYSTEM USING “CLASSIC” STACKING
This type of system will include only two FX’s and must be set up as described here. Turn off all AC Output and AC Input breakers
before powering up FX’s. In a dual stack, I am assuming that the top FX is plugged into port 1 of the HUB and the 2
nd
FX down is
plugged into port 2 (the location of the FXs is not a rule, just for simplicity). Using the MATE, go to the stacking menu (explained earlier
in the “Stacking Instructions” section). You are now at the 1
st
stacking menu called “Stack Phase”. In the upper right hand corner of
the mate screen will always be the HUB port number of the FX you’re working with at the time. Let’s start out with the FX that’s on port
1. If something other than P01 appears in the upper right hand corner then press the PORT button until P01 appears. Set the “Stack
Phase” of the port 1 FX to “1-2 PH Master”. Press the PORT button and verify that the label in the upper right hand corner displays
P02. We are still in the “Stack Phase” menu but we are now talking to the FX on port 2. Push the INC button once to set the “Stack
Phase” to “Classic Slave”. Now you’ve set 1 FX (P02) to be in series with the master (P01). The next two screens in the STACK menu
do not apply to a Classically stacked system, so you need not worry about them. Have fun with your system!
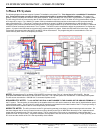
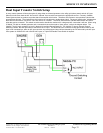
STACKED SYSTEM USING OUTBACK’S “PARALLEL” STACKING
This type of system may have between 2 and 10 FX’s that will have their AC Outputs connected to the same Leg. We will be using a
Quad-Stacked (4 FX) system as an example. If you have less than four FX’s then any reference to FX’s on ports greater than the
amount of FX’s in your system will not apply to your system. If you have more than four FX’s then follow the natural pattern of
programming that will become apparent in this example.
In a quad stack, I am assuming that the top FX is plugged into port 1 of the HUB, the 2
nd
FX down is plugged into port 2, the 3
rd
FX
down is plugged into port 3, and the 4
th
FX down is plugged into port 4 (again, location of the FXs is not a rule, just for simplicity).