


Copyright 2003 OutBack Power Systems, Inc. FX & VFX Series Inverter/Charger System Installation & Programming Manual
19009 62
nd
Ave NE, Arlington WA 98223 USA 900-0027-1
Tel 360 435 6030 Fax 360 435 6019
Rev 7.2 08/26/05 Page 23
START-UP & OPERATION
Once the FX system installation is completed, it is time to power the system. Leave the breakers on the AC side in the OFF position
until the FX’s are powered and programmed. Power the FX’s (and any MX-60 charge controllers) by switching the DC disconnect
breakers to the ON position. The LED’s (Light Emitting Diodes) in the AC compartment of each FX will begin to light. For each FX, one
“BATTERY” LED will be lit. This “BATTERY” LED should be either the green “FULL” LED or yellow “OK” LED. If the red “LOW” LED is
lit, check the battery voltage and the battery-to-FX cabling for reasons why the FX thinks the batteries are low. The other set of
“STATUS” LED’s will begin to light. The red “ERROR” LED may blink a few times, but this is just a symptom of powering the FX.
About 5 seconds to 10 seconds after power is applied, the green “INVERTER” LED should be lit and the “AC IN” and “ERROR” LED’s
should not be lit.
At this point, the FX is producing an AC output voltage, or inverting, hence the reason the “Inverter” LED is lit. If the user were to
connect AC loads to the FX, the FX would use battery power to produce AC power to power the loads. Before doing this, the
programming of the FX should be performed using the MATE. If applicable, this programming should include the following:
• Choose the AC input type of grid or generator. Generator is the default. See the SETUP MENU page in the ADVANCED
section for more info.
• Stacking of multiple FX’s. See the STACKING INFORMATION and the STACKING INSTRUCTION sections for proper setup
info. Also see the STACKING MENU in the ADVANCED section for programming info.
• Adjust the charging set points using the battery manufacturers specification. See the BATTERY CHARGING INFORMATION
section to directions and familiarity of the FX’s charging process. Also see the CHARGER MENU in the ADVANCED section
for programming info.
• Set the time and the date on the MATE (see MATE manual).
• Program the Auxiliary output for the function you wish it to perform. If you wish to automatically start a generator, see the
AUTOMATIC GENERATOR START section of this manual (you may also need the MATE manual). In any case, also see the
AUXILIARY MENU in the ADVANCED section of this manual for programming info.
• Perform any other programming that you wish in the ADVANCED section of this manual.
The FX system is now ready to perform per your specification. Switch the AC output breakers on with the bypass mechanism switched
to “Normal”. If there are X-240 breakers switch them on at this time. Next, switch on the AC input breakers. Provided that the AC
source to the FX’s is available, the yellow “AC IN” LED in the AC compartment will begin to blink. If the voltage of the utility grid or
generator is within 108 vac to 140 vac and the frequency is within 54 Hz to 66 Hz, the FX will connect to the utility grid or generator.
This process takes about 30 seconds and the “AC IN” LED will stop blinking and stay lit when connection occurs.
When the “AC IN” LED is lit, the AC transfer switch within the FX is activated and the utility grid or generator power is applied to the
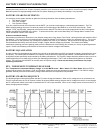
loads. At this time the FX will perform a charge on the batteries. The charging process is different depending on whether the generator
has been started automatically or manually. The start of either charging process will “Bulk” (raise) the battery voltage until they reach
the “Absorb” voltage. The FX will maintain this “Absorb” voltage for the “Absorb Time Limit” (default of 1 hour). If the generator had
been automatically started, the generator will now be shut off. However, if the generator had been manually started the charging
process continues. After the “Absorb” stage, the FX goes into “Silent” mode, letting the battery voltage drop until it levels out. If the
battery voltage drops to the “Re-Float” voltage the FX will perform a “Float” charge. It raises the battery voltage to the “Float” voltage
and it then sustains this voltage for the “Float Time Period” (default of 1 hour). Once this hour is up, the FX will go back into “Silent”
mode, and again wait for the battery voltage to drop to “Re-Float”. This process of “Silent”, “Re-Float”, “Float, “Silent”, “Re-Float”, etc.
will continue until the generator is manually shut off.