


Copyright 2003 OutBack Power Systems, Inc. FX & VFX Series Inverter/Charger System Installation & Programming Manual
19009 62
nd
Ave NE, Arlington WA 98223 USA 900-0027-1
Tel 360 435 6030 Fax 360 435 6019
Rev 7.2 08/26/05 Page 27
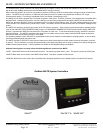
STACKING INSTRUCTIONS
Stacking Procedure
This section will help inform you on how to set up stacking correctly and what the screens in the stacking menu mean. (Remember, for
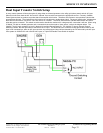
3-phase stacking a jumper must be set to the 3-ph position in the HUB. See HUB manual for further information.) Make sure that the
FX’s connect to the lowest numbered ports of the HUB. First, turn off all AC breakers (the Bypass breaker can be left on). Next, turn
on all FX’s using their DC breakers and verify that the MATE recognizes all FX’s. You can verify this by watching the MATE go through
its boot-up sequence. The MATE’s boot-up sequence will show the following screens: (1) “G’day Mate!” (2) “OutBack Power Systems”
(3) Version (4) “HUB Found” (5) Hub ports and the OutBack devices connected to them. Screen (5) will allow you to verify that the
MATE sees all of the FX’s. If it doesn’t see all of the FX’s or if you aren’t sure, you can do one of two things. Either disconnect and
reconnect the MATE to the HUB or do a re-poll with the MATE. A re-poll on the MATE can be done by following the path MAIN /
SETUP / MATE / PG2 / COMM / REPOLL (see the MATE manual for proper operation of the MATE). Once you are sure that the
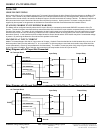
MATE recognizes all the FX’s connected to the HUB, you must access the “STACK” menu. This can be found on the MATE by
following the path MAIN / ADV / any button (this screen serves as a warning only) / PASSWORD (press the INC and DEC
buttons until the number is 141 and then press ENTER) / FX / PG2 / PG3 / STACK. You are now in the menu used for stacking
FX’s. Before continuing we will inform you on what each screen pertains to, the possible selections of that screen and how to choose
the next FX for proper programming.
STACK PHASE
The “Stack Phase” screen establishes which FX is the master and which FX’s follows the master’s commands. Each FX has a default
of “1-2ph Master” (one or two phase Master). The FX on port 1 of the HUB is always a Master (and usually the only Master), otherwise
the MATE will give a communication error. For a single phase or split (two) phase system, the FX in port 1 of the HUB should remain a
“1-2ph Master”. For a 3-phase system, the FX on port 1 of the HUB must be changed to a “3ph Master” (this procedure will be
explained soon). To select the next FX connected to the HUB, press the PORT button on the MATE. In the upper right-hand corner of
the MATE’s screen is the “port” indicator. It will display a “P” followed by a number indicating the port it is controlling (for example “P01”
indicates port 1, the Master FX’s port). Repeatedly pressing PORT on the MATE will cycle through the ports on the HUB that have FX’s
connected to them. Stop when you have reached a port that has an FX on it that needs to be a Slave. By pressing the INC (increase)
and DEC (decrease) buttons on the MATE, you can select the proper type of Slave that is appropriate for your system. Below are the
different selections in the STACK PHASE menu with a description of what they do.
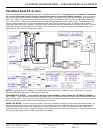
1-2 PH MASTER: 1-2 PH MASTER is used for stand-alone (one) FX systems OR as the MASTER of a single phase or split
phase system.
Set the stack phase of the FX you want as the master to ‘1-2 PH Master’ (if it isn’t already) and make sure it is in
port 1 of the HUB. It is acceptable to have every FX connected to the HUB be a “1-2ph Master”. If this is the case, each FX must
be connected to a separate AC Output Leg (both Hot and Neutral). The master FX is always considered to be the L1 phase.
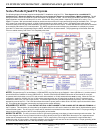
CLASSIC SLAVE: If you have a system with two FX’s that you wish to produce 240VAC with but without an X-240
autotransformer, set the stack phase of the FX you want as the slave to “Classic Slave” and make sure it is in port 2 of the hub.
“Classic” stacking is meant for 120/240 vac systems where each FX handles their own 120 volt phase. The combination of the two
FX’s creates 240 volts to run 240 loads. If this FX is set to ‘Classic Slave’ then its output is 180 degrees out of phase from the
master and is considered to be the L2 phase. Classic stacking can only stack two FX’s and there is no load sharing which is
possible with ‘OutBack’ stacking.
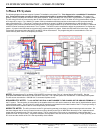
OB SLAVE L1: Single Phase: If you have a system with two to ten FX’s and you wish to produce 120VAC on the same AC
Output Leg, set the stack phase of the FX’s you want as the slaves to “OB Slave L1” and make sure that they are in the lowest
numbered ports of the HUB. “OB Slave L1” is used for FX’s that run in parallel with the master. These FX’s are considered the L1
phase.
Split Phase: Alternately, if you have a system with two to ten FX’s and an X-240 autotransformer and you wish to produce
120VAC on both AC Output Legs and also 240VAC between the two AC Output Legs then set the stack phase of the FX’s you
want as parallel slaves (Leg 1) to “OB Slave L1”. Make sure the slave FX’s are in the lowest numbered ports of the HUB. “OB
Slave L1” is used for FX’s that run in parallel with the master. OutBack’s X-240 autotransfromer must be included in the system to
use the split-phase stacking option. This FX is considered the L1 phase.
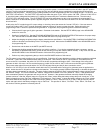
OB SLAVE L2:
If you have a system with two to ten FX’s and an X-240 autotransformer and you wish to produce 120VAC on
both AC Output Legs and also 240VAC between the two AC Output Legs then set the stack phase of the FX’s you want as series
slaves (Leg 2) to “OB Slave L2”. Make sure the slave FX’s are in the lowest numbered ports of the HUB. “OB Slave L2” is used
for FX’s that run in series with the master. OutBack’s X-240 autotransfromer must be included in the system to use this stacking
option. This FX is considered L2 phase.
3PH MASTER: If you have a system with three (and only three) FX’s and you wish to produce 120VAC on three AC Output Legs
as well as 208VAC between each AC Output Leg, set the stack phase of the FX you want as the master to “3PH Master” and make
sure it is in port 1 of the HUB. The 3-phase stacking is similar to “Classic” stacking in the sense that each FX acts independently
and cannot help out other phases. The HUB also has a jumper on it that needs to be changed for 3-phase stacking (refer to the
HUB manual). This FX is considered phase A.
3PH SLAVE: If you have a system with three (and only three) FX’s and you wish to produce 120VAC on three AC Output Legs
as well as 208VAC between each AC Output Leg, set the stack phase of the 2 FX’s you want as the slaves to “3PH Slave” and
make sure they are in ports 2 and 3 of the HUB. There are no selections to differentiate between phases B and C. When you set
the jumper in the HUB for 3-phase, the HUB tells each slave which phase they are. “3PH slave” on HUB port 2 is considered
phase B. “3PH slave” on HUB port 3 is considered phase C.