80 – 81
1. Touch the OPTIONS button.
2. Select SETTINGS.
3. Touch BASIC SETTINGS.
4. Show or hide information.
[
4
]
A GREEN triangle shows the current position.
If you display a planned or loaded route and the
given starting point is not the same as your
current location, then the current position may
not be shown on the preview.
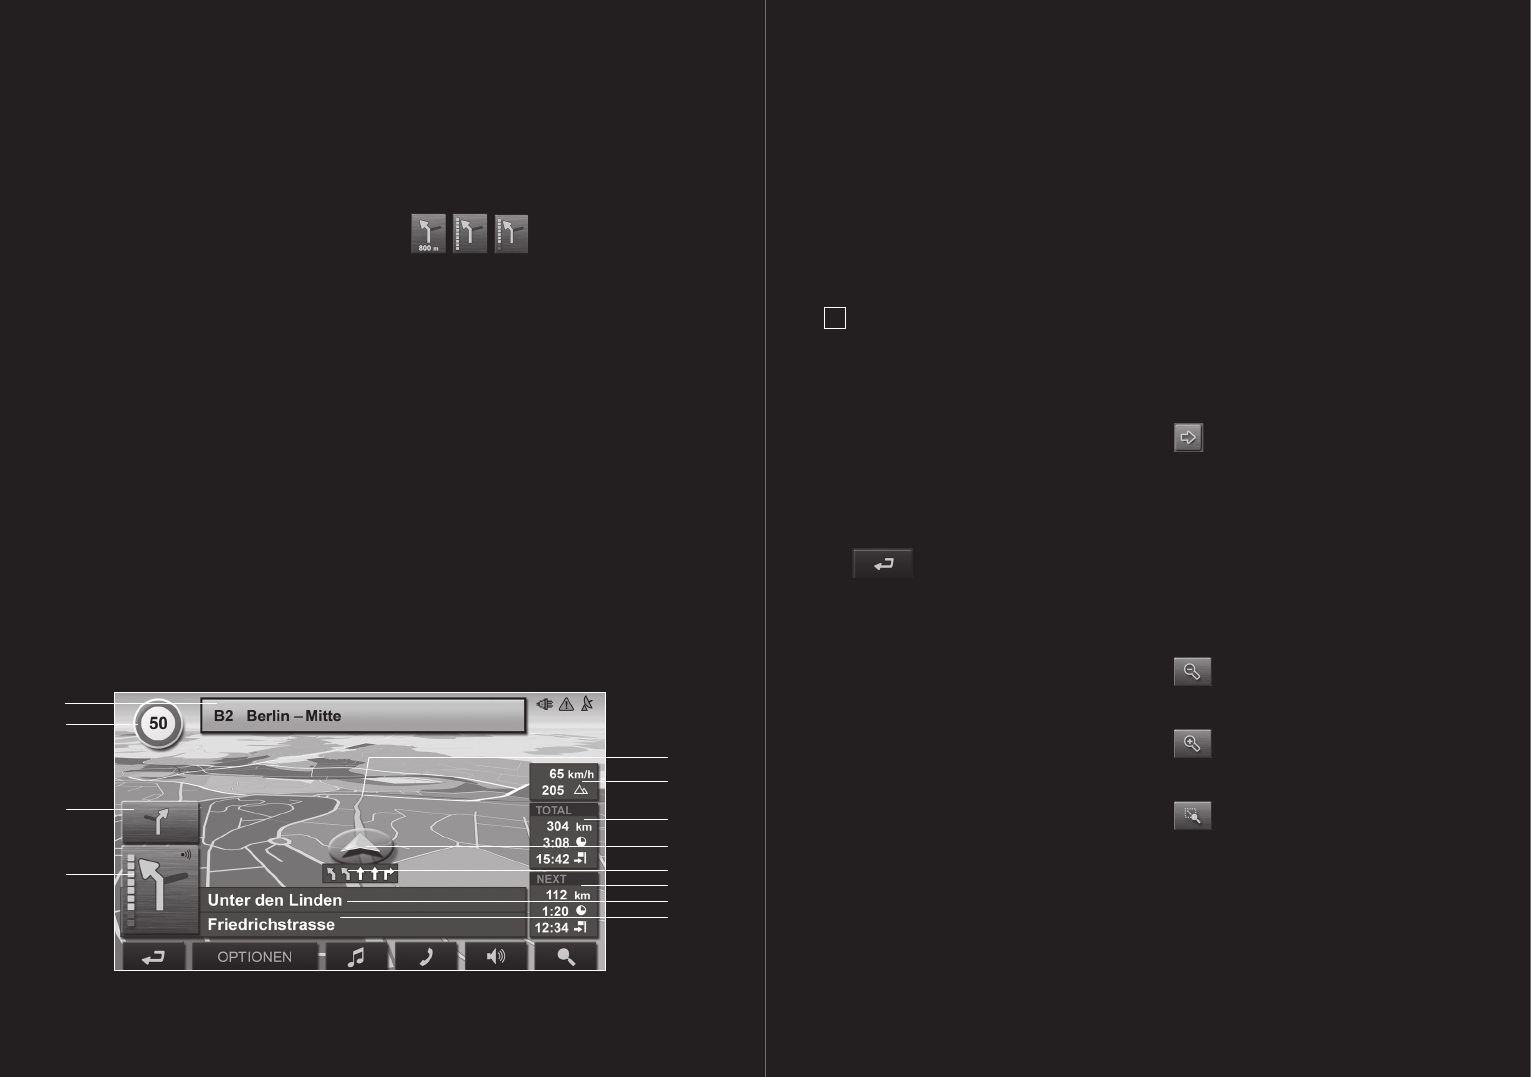
8.3 Map in Navigation mode
After the route has been viewed in PREVIEW mode,
the navigation has been started. The map screen
opens in NAVIGATION mode.
[
Fig. 10
]
[
1
]
Shows the signing that is to be followed.
[
2
]
Possible speed limits may be shown here.
[
3
]
If two maneuvers need to be executed quickly
this shows the maneuver to be executed
immediately after the next maneuver.
[
4
]
Shows a diagram of the next junction where
you should turn off. Underneath is the
remaining distance to this junction.
When you approach the junction, you will see
a spot diagram instead of the distance.
The nearer you are to the junction, the fewer
green spots are displayed.
If you don’t have to change direction for a
longer period, you will only see a forward-
facing arrow with the distance shown
underneath, which shows how long you are to
follow the current road.
[
5
]
The route is depicted in the GREEN.
[
6
]
A triangle in GREEN shows the current position
on the map. The displayed sector of the map
changes continually to show your current
position centered on the map whenever
possible.
[
7
]
The height above sea level and the current
speed is shown here.
[
8
]
Shows the route, the estimated trip duration,
and the estimated time of arrival.
[
9
]
Shows the entire route, the estimated trip
duration and the estimated time of arrival for
the current stage.
08 Working with the map
[
10
]
The traffic lanes that lead to your destination
are depicted in the GREEN.
[
11
]
The name of the route section that you need to
drive onto next is shown in the upper street
field.
[
12
]
The name of the street you are currently driving
on is shown in the lower street field.
!
Note:
– The displays for many of the above
mentioned areas can be configured via
OPTIONS > SETTINGS > BASIC
SETTINGS. A number of displays only
work when the corresponding information
is available on the map.
– If you touch the large arrow field, then the
current route instruction will be repeated.[4]
Quit navigation
In order to end navigation, proceed as follows:
1. Touch the
BACK button.
2. Confirm quitting.
Map functions in Navigation mode
When the map is open in the NAVIGATION mode,
touch any point on the map. Various buttons with
options will be displayed.
2D / 3D: Changes between 2D and 3D mode. The
symbol of the mode currently set is displayed in green.
DAY / NIGHT: Toggles between the DAY and NIGHT
touchscreen display modes. The symbol of the
mode currently set is displayed in green.
INTERIM DESTINATION: Opens the menu for
entering a way point.
The navigation system will then guide you to this
way point first. Afterwards, you can continue your
journey to your original destination.
SKIP ROUTE POINT: When this button is touched,
the next route point is omitted. This button is
inactive when less than 2 stages are pending.
BLOCK: Blocks a route stage in order to, e.g.,
avoid a traffic jam. The route will then be calculated
around the blocked route stage.
Touch this button once in order to remove the
block.
POI ON YOUR ROUTE: Touching this button
displays Points of Interest on the given route. A
destination shown here can also be selected as a
way point. In order to do so, touch the
INTERIM DESTINATION button.
8.4 Map in Destination search mode
The map is always in DESTINATION SEARCH
mode, when a pair of crosshairs are to be seen.
[
Fig. 10
]
When you are driving, the map does not change
direction. It is always oriented with north shown at
the top.
ZOOM OUT: The map section enlarges.
There are fewer details shown.
ZOOM IN: The map section shown
decreases in size. More details can be seen.
ZOOM MODE: If this button is active, the
map section can be traced with a finger or the pen
from top left to bottom right and afterwards zoomed
to screen size. If the map section is traced from
bottom right to top left, the map will zoom out.
Fig. 10
[
7
]
[
5
]
[
8
]
[
6
]
[
9
]
[
10
]
[
11
]
[
12
]
[
3
]
[
1
]
[
2
]
[
4
]


