


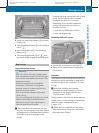

accessories and/or the objects attached to
them could come loose from the vehicle,
thereby injuring you and other persons and/
or causing damage to property, including
damage to your vehicle.
!
Have a second person assist you when
installing the crossbars. Otherwise, the
vehicle could be damaged.
!
Objects that are attached to crossbar
system accessories must not limit or
obstruct the movement of the sliding
sunroof. Otherwise, the tilt/sliding sunroof
could be damaged when it is raised.
:
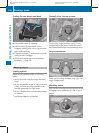
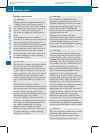
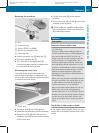
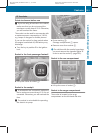
Key
;
Protective cap
=
FRONT (or REAR) sticker
?
Bolt for the clamping claw
A
Clamping claw
The front and rear crossbars differ in length.
For this reason, pay attention to FRONT or
REAR sticker = on the crossbars.
X
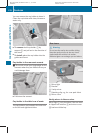
Unlock protective cap ; using key :.
X
Remove protective cap ;.
Sticker = for identifying the installation
location FRONT or REAR becomes visible.
X
Turn bolt ? counter-clockwise using the
Allen key until clamping claw A is wide
open.
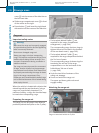
B
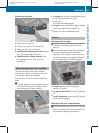
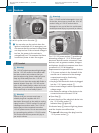
Front crossbar
C
Rear crossbar
D
Recesses
E
Markings
F
Roof rails
X
Position front crossbar B between marks
E on roof rails F.
i
There are marks E on the inner edge of
the roof rail that are identified by white
lines.
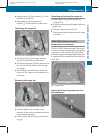
?
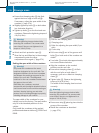
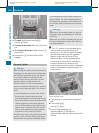
Bolt for the clamping claw
A
Clamping claw
F
Roof rails
X
Ensure that clamping claw A sits flush
against the inner edge of roof rail F.
If necessary, adjust the span width of the
crossbar (Y page 276).
X
Slightly tighten up bolts ? on both sides
in a clockwise direction.
X
Position rear crossbar C on roof rails F
so that the clamping claws engage in
recesses D in the roof rails.
Stowage areas
275
Loading, stowing and features
BA 164.8 USA, CA Edition B 2011; 1; 2, en-US
d2sboike Version: 3.0.3.5
2010-04-21T15:08:44+02:00 - Seite 275
Z