123
The unit is set at the factory to automatically create and record a trail
while the unit is turned on. The unit will continue recording the trail
until the length reaches the maximum trail point setting (default is
2,000, but the unit can record trails 9,999 points long). When the point
limit is reached, the unit begins recording the trail over itself.
With the default auto setting, this unit creates a trail by placing a dot
(trail point) on the screen every time you change directions. (The methods
used for creating a trail and the trail update rate can both be adjusted or
even turned off. See Sec. 8 for Trail Options.)
To preserve a trail from point A to point B, you must "turn off" the trail
by making it inactive before heading to point C or even back to point A.
When the current trail is set inactive, the unit automatically creates
and begins recording a new trail.
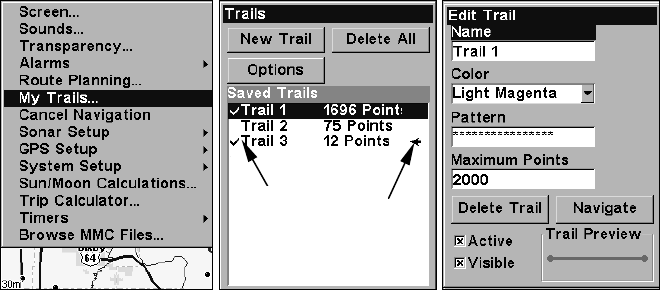
To Save a Trail
1. Press
MENU|MENU|↓ to MY TRAILS|ENT.
Sequence for saving a trail and beginning a new one. At left, My Trails
command. Center, the Trails Menu. The arrow to the right of Trail 3
indicates the trail is "active," and the check to the left indicates the
trail is visible on the map display. The right figure shows the Edit
Trail menu, with the Name command selected.
2. Press ↓ to the Active Trail Name|ENT.
3. Press ↓ to
ACTIVE|ENT. This unchecks the Active option.
4. To return to the previous page, press
EXIT|EXIT|EXIT|EXIT. As you
leave the Edit Trail menu, you will notice that a new trail starts with a
new sequential number. In the example figure below, the new trail is
number 4, showing zero points. Note that Trail 3 is inactive, but it is
still visible on the map.
Active
symbol
Visible
symbol


