


2
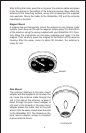
Even with S/A on, and without a DGPS receiver, your GlobalNav 310
gives you outstanding position and navigation information.
Please sit down with the unit and this manual and familiarize yourself with
them before using the GlobalNav 310 in the “real world”. A simulator is
built in, which lets you practice.
INSTALLATION
INSTALLATION - Bracket
You can install the GlobalNav 310 on the top of a dash or from an overhead
with the supplied bracket. It can also be installed in the dash with an
optional IDA-3 mounting kit. A swivel bracket is included that converts the
GlobaNav 310's gimbal bracket to a swivel mount. You can mount it in any
convenient location, provided there is clearance when it’s tilted for the best
viewing angle.
Bracket Installation - No Swivel
Holes in the bracket’s base allow wood screw or through bolt mounting.
It may be necessary to place a piece of plywood on the back side of thin
panels to reinforce the panel. Make certain there is enough room behind
the unit to attach the power and antenna cables.
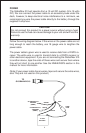
Drill a hole in the dash for the power and antenna cables. The best location
for this hole is immediately under the gimbal bracket. This way, the bracket
covers the hole. The smallest hole the power and antenna cable connector
can pass through is 3/4". Route the cables to the unit by passing them
through the hole from under the dash. Slide the bracket over the hole, then
route the cables out the slot in the back of the bracket. Finally, fasten the
bracket to the dash.
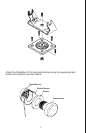
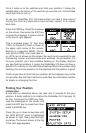
Bracket Installation - With Swivel
1. Place the swivel bracket on the dash or console in the desired mounting
location. Make certain there is enough room for the unit to rotate. Using
the swivel bracket’s base as a template, mark the four mounting holes
for drilling. Remove the bracket and drill the holes in the mounting
surface for the #10 mounting screws.
2. Install the large locknut into the bottom of the swivel bracket. Place the
swivel bracket onto the mounting surface and attach it using the four
supplied #10 screws.
3. Pass the large screw through the gimbal bracket and the swivel
bracket. Thread it into the large locknut and tighten it. Don't tighten it
too tight, or the gimbal bracket won't swivel.