


Removing
and
Replacing
the Apollo
GX
The following procedure is used to remove the Apollo
GX so you can operate it at a location of your choice. .
While inserting or removing the GX, Do not exert
excessive turning force at the end of the cam lock
travel or the unit may be damaged.
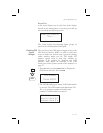
1. Remove the Apollo GX from the front panel of
your aircraft. Use the 3/32” hex driver included
with installation kit (p/n 998-0048 ). Insert the hex
driver into the hole at the top, center of the front
panel of the GX-series. Turn the hex driver
counterclockwise to loosen the connecting screw.
2. Pull the Apollo GX out of its mounting tube.
3. Connect the GX-series Power Cable Assembly (p/n
500-4027 for the GX55 or 500-4026 for the
GX50/60) to the connector(s) on the back of your
Apollo GX. Connect the cable to a power supply
that provides 10 to 40 VDC @ 1A or greater.
Attach the black wire to ground and red wire to
positive. A suitable power supply may be purchased
at an electronics or auto supply retailer.
Note
Operation of the GX60/65 transmitter is not
permitted in a residential or industrial
environment without an appropriate FCC
license. Operation of the GX50/60 with a serial
port connected to a computer is not currently
authorized under FCC part 15 regulations.
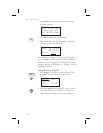
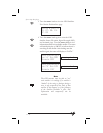
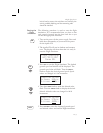
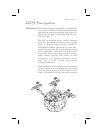
4. Replace your GX into the tube carefully. Position the
cam lock as shown below. The front lobe of the cam
should be vertical. The cam lock mechanism should
be fully unscrewed (turned counter-clockwise). Slide
the unit into the frame. Turn (clockwise) and
carefully hand-tighten (4 in-lb max.) the cam lock
mechanism using only the 3/32" hex driver provided
in the installation package. Using a larger tool than
the one provided makes it easy to exceed the
allowable torque on the cam lock resulting in
damage to the unit. The unit will be pulled into the
frame securing the unit and the connectors will fully
engage. Do NOT overtighten. The back of the bezel
must only be flush to the mounting tube. If the cam
12-2
Flight Simulator
BEZEL
FRONT
CAM UP
REAR CAM
DOWN
POSITION
CAM FULLY
TO REAR
BEFORE
INSERTION