


111
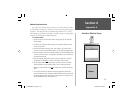
Phone & Modem Options Icon
Appendix H
Section 6
Interface Modem Setup
Phone & Modem Options Dialog
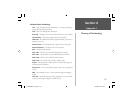
Modem Properties Dialog
Modem Setup Instructions
If you select the ‘Modem’ interface option
to use the NavTalk as a modem
to communicate with devices or software, you must perform the following setup
procedure. This example shown is performed using Windows
®
NT or 2000.
Most Windows applications will perform in a similar manner with slight graphic
variations for the application windows displayed.
To setup the modem:
1
. Access the Interface Tab of the Main Menu Settings page. Set the serial data
fi eld to ‘Modem’ .
2. Connect the PC Serial Data Cable Accessory to an available COM port on your
PC and to the NavTalk.
3. Install a new modem by selecting ‘Start’, then ‘Settings’, and ‘Control Panel’.
Then click on the ‘Phone and Modem Options’ icon to display the dialog pages.
4. Select the ‘Modems’ tab. Add a 14400 bps Modem from the list displayed when
you click on the ‘Add” button. Confi gure this new modem to use the COM port
connected to the NavTalk .
5. Select the properties dialog and be certain to set the modem for a maximum
port speed of 19200 and Not
to wait for a dial tone (uncheck the box).
6. For the software that will use the NavTalk as a modem...select the ‘Standard
14400 bps Modem’ that you added in Step 4. Then set the dial-up number.
Note that, it may be helpful to turn Off
the modem error control if the software
allows.
7. To set the AT commands for software not already supported by the NavTalk,
access the ‘Advanced’ tab of the Modem Properties dialog and enter the desired
commands. Additional information about AT commands can be found by access-
ing the GARMIN web site at www.garmin.com.
NvTlkGSMManual copy.indd 111 12/2/2002, 8:43:49 AM