


-
2
.
9-
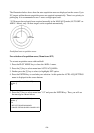
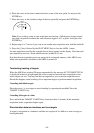
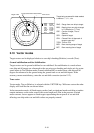
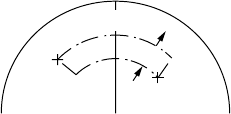
6. Place the cursor at the outer counterclockwise corner of the area (point A) and press the
ENTER key.
7. Place the cursor at the clockwise edge of the area (point B) and press the ENTER key.
A
B
0.5 nm
Note: If you wish to create an auto acquisition area having a 360-degree coverage around
own ship, set point B in almost the same direction (approx. ±5°) as point A and press the
ENTER key.
8. Repeat steps 5 to 7 above if you want to set another auto acquisition area with the trackball.
9. Press the [1] key followed by the PLOT MENU key to close the ARPA 1 menu.
An auto acquisition area like the example shown above appears on the display. Note that each
auto acquisition area has a fixed radial extension (width) of 0.5 nm.
Note that the auto acquisition areas are preserved in an internal memory of the ARPA even
when auto acquisition is disabled or the ARPA is turned off.
Terminating tracking of targets
When the ARPA has acquired 20 targets automatically, the message AUTO TARGET FULL
is displayed in the box at right-hand side of the screen and no more auto acquisition occurs
unless targets are lost. You may find this message before you set an auto acquisition area.
Should this happen, cancel tracking of less important targets or perform manual acquisition.
Canceling individual targets
Place the cursor (+) on a target to cancel tracking by operating the trackball. Press the
TARGET CANCEL key.
Canceling all targets at a time
Press and hold the TARGET CANCEL key down more than 3 seconds. In the automatic
acquisition mode, acquisition begins again.
Discrimination between landmass and true targets
A target is recognized as a landmass and thus not acquired if it is 800 m or more in range or
bearing direction.