


-
2
.
7-
Enabling and disabling auto acquisition
1. Press the RADAR MENU key and [8] key twice followed by the ENTER and RADAR
MENU key if the ARPA is not yet activated. Note that the label ARPA appears in the box
at the upper-right on the screen.
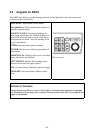
2. Press the PLOT MENU key to show the ARPA 1 menu.
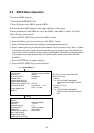
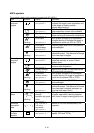
[ARPA 1]
1 VECTOR TIME 30SEC/1/2/3/6/12/15/30MIN
2 AUTO ACQ OFF/ON
3 AUTO ACQ AREA 3 6/[SET]
4 GUARD ZONE OFF/ON
5 [GUARD ZONE SET]
6 TARGET BASED SPEED
7 REFERENCE TARGET VECT OFF/ON
8 COLLISION ALARM OFF/ON CPA x.xKT
TCPA xx.xMIN*
9 [TRIAL MANEUVER]
0 [ARPA 2] * Setting range: 1.0 to 99.9 min
3. Press the [2] key to select menu item AUTO ACQ.
4. Further press the [2] key to select (or highlight) ON (enable auto acquisition) or OFF
(disable auto acquisition) as appropriate.
5. Press the ENTER key to conclude your selection followed by the PLOT MENU key to
close the ARPA 1 menu. Note that the label AUTO+MAN is displayed in the box at the
upper-right on the screen when auto acquisition is enabled; MAN when auto acquisition is
disabled.
Note: When the ARPA has acquired 20 targets automatically, the message AUTO TARGET
FULL is displayed in the box at the right-hand side of screen.
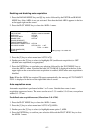
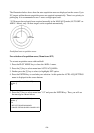
Auto acquisition areas
Automatic acquisition is performed within 1 or 2 zones. Outside these zones is auto
acquisition suppressed zones. The zones can be set at 3-3.5 n and/or 5.5-6.0 nm, or anywhere
within 0.2 - 32 nm.
Predefined auto acquisition areas (Menu item: 3 & 6 NM)
1. Press the PLOT MENU key to show the ARPA 1 menu.
2. Press the [3] key to select menu item AUTO ACQ AREA.
3. Further press the [3] key to select (or highlight) menu option 3, 6NM.
4. Press the ENTER key to confirm your selection followed the PLOT MENU key to close
the ARPA 1 menu.